Showing posts with label dessert. Show all posts

Monday, August 10, 2009

Today's Kool Idea: Micro S'mores - Microwave S'more Maker

Guess what The Daily Kool found out? There is actually a National S'mores Day, and it's today (August 10)! Ah, s'mores...the delicious gooey campfire treat that is made up of graham crackers, chocolate and marshmallows. These are even worse than those potato chips (sorry, Lays). There is no way we can eat just one...we need "s'more, s'more!" Hence, the name. Bet you didn't know that, did you?

We have to admit that we're a bit confused, though...it happens to us often, we're afraid (must be the sugar high). Why on earth is National S'mores Day in August when National Camping Month is June? Darn it...now we have yet another excuse to indulge in this decadent dessert. Our taste buds might be cheering, "Hooray," but our ever-expanding waistlines are shouting "No way." No doubt about it, taste buds win hands down. There's only one problem. How do we make s'mores at home without the benefit of a roaring campfire?

Check out the Micro S'mores microwave s'mores maker. We came across this nifty little gadget while watching the cooking show on QVC yesterday...Sunday's cleaning day, and we do need some non-cartoon entertainment every once in a while. Anyway,
Micro S'mores (complete with recipe book) claims to make the most delicious s'mores you've ever had in ten seconds or less. The process is simple...just load the Micro S'mores with a graham cracker, chocolate and one marshmallow (don't forget to top with another cracker), pop on the lid and microwave on high for 10 seconds. The domed cover is apparently designed to ensure even microwave energy distribution from the inside out, keeping the graham cracker crisp while completely melting the chocolate and marshmallow. At the same time, the auto-plunger applies just the right amount of pressure to form the perfect s'more.

While it is unlikely that the
Micro S'mores will yield that true roasted marshmallow flavor of a traditional s'more (really, how could it?), it certainly offers a yummy alternative. Plus, if it works as well as it seems to on television, The Daily Kool is absolutely sold. The overwhelming positive reviews suggest that the Micro S'mores is just as great as it seems. Sure, we could probably produce passable results with a simple tea light and save the $22 or so. But the Micro S'mores seems like a lot of quick, kid-friendly fun. Plus, it'll give us a great opportunity to experiment with different s'mores flavors, right in our kitchen. How "kool" is that?

We love that the order actually comes with a set of two individually boxed items. We'll probably give the second one as a housewarming gift. Think of how impressive it would be to fill a large basket with the
Micro S'mores, surrounded by packages of graham crackers, cookies, marshmallows and different types of chocolate. Oh, yeah...our friends love us. In the meantime, try this twist (albeit extreme) on a genuine classic. Enjoy!

Caramelicious Cookie S'mores
Ingredients
two oversized chocolate chip cookies
1 caramel-filled chocolate piece, your brand of choice (we like Ghiradelli)
1 large marshmallow

Directions: Place the caramel-filled chocolate piece on one cookie, top with a marshmallow, and top with the second cookie. Put it into the
Micro S'mores and cook for 7-10 seconds.

Note: If you're going the traditional way, heat your marshmallow over a fire. Place the chocolate onto a cookie. Top one cookie with your toasted marshmallow and close like a sandwich.


Bookmark and Share


Subscribe to The Daily Kool by Email

Friday, July 17, 2009

Today's Kool Idea: Nordic Ware Ice Cream Cone Cupcake Baking Pan

What better way to celebrate the end of our National Ice Cream Month week-long feature than with cake? Or should we say cupcakes? The Daily Kool family is headed out to a friend's house for dinner together tonight...of course, we're in charge of the dessert (we have a bit of a reputation). Since there's going to be a pretty large group of kids at the house, we thought it might be fun to do something a little different for them.

Take a look at this adorable ice cream cone cupcake baking pan from Nordic Ware. Since we are always on the lookout for unusual novelty pans, we're pretty excited about this one. Do these cupcakes look just like ice cream cones, or what? Gotta love that Nordic Ware! We really love the detail of this pan. Constructed of heavy cast-aluminum, it is non-stick coated for easy cake removal and clean up. Plus, since the pan measures 3" deep and 10.5" across, it will produ
ce six nice size, cone-shaped cupcakes at one time.

Our creative juices are really flowing with possibilities with the Nordic Ware ice cream cone cupcake baking pan, but we're keeping it pretty simple for tonight's event. We're going to bring several cans of Betty Crocker easy flow icing and some sprinkles to make the "ice cream" to top our cupcake cones. The kids can sit down and decorate to their hearts' content. We'll also bring along a couple of containers of real ice cream...our local supermarket has a "buy one, get one free" special going on this week. The kids can top their cupcakes with ice cream instead of the frosting, or maybe we'll just give each of them a plate and put a scoop on the side so they can have it all...yep, that's probably the way we'll go.

As with all high quality baking pans, we strongly recommend hand-washing this one. Hey, superior baking comes at a superior price (around $35), so we'd prefer our pans to last forever. Also, make sure to grease the Nordic Ware
ice cream cone cupcake baking pan very well to avoid stickiness. With so many intricate details to create the realistic effect, even a non-stick coating just isn't enough. Pam baking spray with flour (found in your local supermarket) always gives us excellent results. Experiment with a boxed cake mix first...it's easier, kids love it, and it tends to have the great consistency for beginners with these kinds of pans.

It's just too bad we can only make six cupcakes at a time...we'll be spending most of the day in the kitchen baking. But, with this super "kool" Nordic Ware
ice cream cone cupcake baking pan, we are absolutely going to be the hit of the party tonight. Yeah we know we're showoffs, but seriously...how could we resist?


Bookmark and Share


Subscribe to The Daily Kool by Email

Thursday, July 16, 2009

Today's Kool Idea: Zeroll Original Ice Cream Scoop

Here at The Daily Kool, our arms are getting quite the workout this summer...well, at least one arm, anyway. Our kids have been having one playdate after another at the house, and we've been doling out ice cream scoops practically by the dozen each day. Dig, twirl, release...dig, twirl release. Such is our life. It's amazing how one single perfect scoop of ice cream just seems to brighten a child's day...wait a minute, did we say perfect? A lofty, yet often elusive goal, we know. But apparently (and we've just recently learned this, mind you), a dish or cone of ice cream just tastes better to a kid if it has that professional, ice cream parlor look. Go figure, but kudos are important in the world of parenthood...we'll take what we can get. Pretty shallow of us, isn't it?

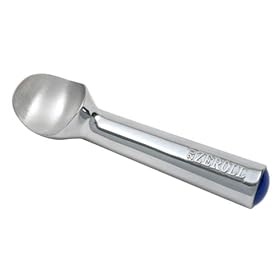
Good thing we have our Zeroll original ice cream scoop. We know, we know...an ice cream scoop is really not something most people think twice about when getting. Ours was a bridal shower gift ten years ago (yikes, has it been that long?). We do admit though, our
Zeroll original ice cream scoop has gotten plenty of use over the years and is arguably still the best on the market. The Daily Kool has certainly never considered or needed a replacement. The secret is a heat-conductive, anti-freeze solution encased within an aluminum alloy. The fluid in the handle responds to the warmth of the hand, helping the bowl roll and release even the hardest ice cream instantly.

The
Zeroll original ice cream scoop is actually pretty comfortable to use, regardless of whether you're right or left-handed (we have both in our family). Plus, it is apparently a top choice of ice cream parlors. However, this professional-grade ice cream scoop does come with a couple of note-worthy considerations. It is absolutely, positively, without a doubt not dishwasher safe...keep temptation away, folks! Trust us, we are as lazy as the next person, but even we take the time to hand-wash this one. One cycle in the dishwasher can render the anti-freeze fluid useless, so don't take the chance. Plus, even the best ice cream scoop in the world may need a little help every once in a while. If your ice cream has formed into a solid block in the freezer, try pre-warming the handle in lukewarm water for a few seconds, then dry quickly with a soft cloth before scooping. Allowing the ice cream to temper a bit results in a faster and effortless scoop and release.

The
Zeroll original ice cream scoop is so innovative that it's apparently been displayed at the Museum of Modern Art in New York City. Art? Well, our ice cream scoops do come out beautiful enough for the kids to make great funny faces out of mini M&Ms, marshmallows and licorice...does that count? Perhaps it's a little pricey (around $15), but the Zeroll original ice cream scoop is definitely worth it. With the proper care, this product just might make it through another decade of marriage. How "kool" is that?


Bookmark and Share


Subscribe to The Daily Kool by Email

Wednesday, July 15, 2009

Today's Kool Idea: Chef's Choice Ice Cream Cone Holder

Our posts honoring National Ice Cream Month have received a lot of interest from our loyal readers, particularly yesterday's "kool" idea, the Chef's Choice Waffle Cone Express ice cream cone maker. However, our review brought up an intriguing point...is a wire rack really the best choice for cooling off our ice cream cones? What if we do decide to decorate them or simply add some melted chocolate to the bottom? A wire rack would most definitely result in a bit of a mess if we laid our fancier ice cream cones on it. We need a better solution...that's right, an ice cream holder!

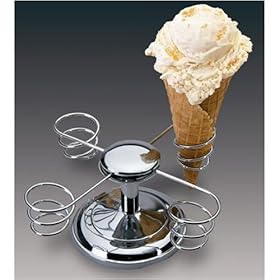
The Daily Kool has found some professional-grade acrylic ice cream cone stands. They're...okay. But being the vain people we are, we want something a little more decorative for our home. Not to worry...Chef's Choice is one step ahead of us with this snazzy ice cream cone holder. This shiny chrome, no stain and easy to clean cone holder is just what we need to create a beautiful presentation. The Chef's Choice Ice Cream Cone Holder boasts four rotating arms of spiraling wire that are designed to even handle heavier ice cream cones securely. The low profile is supported by a weighted four-inch base that won't tip, even when only one cone is in place. Of course, the
Chef's Choice Ice Cream Cone Holder is ideal for helping freshly made cones maintain their shape after rolling.

The
Chef's Choice Ice Cream Cone Holder is a fun and practical way to support homemade cones for filling and display them for eating. What a terrific accessory to the perfect ice cream party! It's truly like having two extra pairs of hands, convenient in the rare event that someone chooses to put his ice cream cone down for a moment. As crazy as it sounds, not everyone inhales their ice cream like we do at The Daily Kool. Our only contention with the Chef's Choice Ice Cream Cone Holder is that it is only designed to display four cones...okay for a family of four, but a regular recipe yields a batch of eight. Though it seems like we can stack cooled cones inside each other, it would be nice if Chef's Choice offered a larger version of the ice cream cone holder with an additional level to handle at least four more separately.

Regardless, the
Chef's Choice Ice Cream Cone Holder is definitely a perfect companion to the Waffle Cone Express. A delightful addition to any summer ice cream party, this holder is a "kool" and handy product that does its job well.


Bookmark and Share


Subscribe to The Daily Kool by Email

Tuesday, July 14, 2009

Today's Kool Idea: Chef's Choice 838 Waffle Cone Express Ice Cream Cone Maker

Nothing says summer quite like an ice cream cone. Some of our best childhood memories include strolling down the boardwalk by the beach with our parents, eating ice cream cones while watching the ocean waves crash against the shore. We could never quite understand how anyone could dishonor the sanctity of ice cream by eating it out of a cup. Good thing we've never quite grown up...as adults, we still love our ice cream cones, even when the sticky mess drips down the side of our arms. Waffle cones help us stay a bit cleaner...not that we care much. We just love them because they are so darned yummy!

At The Daily Kool, we have a bit of a dilemma when it comes to addictions like these. Our taste buds require easy and immediate access for those occasional (okay, frequent) cravings, but our inherent laziness prevent us from taking more trips to the ice cream parlor to satisfy them. Plus, the cost definitely adds up! Sure, ice cream cones are available at our local supermarket, but have you ever read the ingredients in those things? Too many unpronounceable words for us...blech.

Take a look at the Chef's Choice Waffle Cone Express ice cream cone maker. Seriously, folks...nothing beats the incredible aroma and freshness of a home-baked waffle cone. This ice cream cone maker features an advanced professional baking system that delivers homemade, freshly baked sugar cones in about two minutes. Yes, you heard us right...two minutes. Who could resist that temptation? Like your ice cream cone crispier than the average aficionado? No problem...a color-control dial makes that personal browning preference easy to select. An instant temperature recovery feature allows for continuous baking..cone after cone. The unique locking latch function with easy-clean overflow channel ensures each ice cream cone will be uniform in thickness for perfect results each and every time. Plus, the built-in cord storage compartment makes it convenient to keep the
Chef's Choice Waffle Cone Express ice cream cone maker in a space saving, upright position.

A plastic cone-rolling form is included with the
Chef's Choice Waffle Cone Express ice cream cone maker. Illustrated instructions and detailed recipes make it easy to become a master ice cream cone maker in no time. We love how the recipes use everyday ingredients we typically keep stocked in our pantry, and our creative juices are already flowing with several possible variations. Chocolate dipped sprinkle cones, waffle cups, cookies and even cannolis...our waistlines are expanding as we speak! Just be careful when rolling the ice cream cone...it has to be done when it's hot or it won't form properly. Also, make sure to pinch the end properly to prevent ice cream from leaking out...pouring some melted chocolate in the bottom of the cone is an easy (and tasty) solution. Though it has a non-stick coating, we recommend spraying or brushing the Chef's Choice Waffle Cone Express with a little oil before use to make it that much easier.

The
Chef's Choice Waffle Cone Express ice cream cone maker is a great way to enjoy the crunchy sweetness of this sugary treat, straight from the kitchen. It's available all over, but we found the best deal at Bed Bath and Beyond with our 20% coupon...just go to the store to save on shipping, or type in your coupon code online. For about the price of a couple of trips to the ice cream parlor, you can produce delectable, edible delights that are sure to impress each and every time. Friends and family will be amazed at your culinary genius, never guessing how "kool" and easy it is...that's okay, we won't tell if you don't.

Basic Gourmet Waffle Cone

Ingredients:
  • 1 whole egg
  • 1 egg white
  • 1/4 tsp. salt
  • 1/2 cup granulated sugar
  • 2/3 cup sifted all-purpose flour
  • 2 tbsp. butter, melted and cooled slightly
Directions:
  1. Preheat the Chef's Choice Waffle Cone Express. Start with Color Control setting of 2 1/2 to 3, but change as necessary for best results.

  2. Beat the egg, egg white and salt in a small bowl with a fork or hand-held mixer until well blended. Beat in the sugar and beat until sugar is incorporated and the egg has lightened in color slightly, about 1 minute. Add flour and beat another 15 seconds or until incorporated and all lumps are gone. Add the melted butter and stir until well blended.

  3. Spoon 2 tablespoons (1 ounce) of batter in the center of the iron. Bake for 1 minute then check for proper color. Cook an additional 5 to 10 seconds if necessary.

  4. Quickly remove the waffle from the WaffleCone Express™ onto a clean cloth towel. If the waffle is too hot to handle with your bare hands, use the cloth to help lift and roll the waffle around the cone form. Hold the cone a few seconds to set its shape then place on a wire rack to cool.
Makes about 8 ice cream cones.


Bookmark and Share


Subscribe to The Daily Kool by Email
Monday, July 13, 2009

Today's Kool Idea: Cuisinart ICE-40 Flavor Duo Ice Cream, Frozen Yogurt & Sorbet Maker

The Daily Kool family has always toyed with the idea of getting an ice cream maker for our home. As parents, we are often concerned about controlling the quality of ingredients in the food our children eat. Store-bought ice cream often has additives, so we often prefer the premium brands...hey, if we can't pronounce it, we certainly don't want to eat it. But, wow. Premium ice cream definitely comes at a premium price. An ice cream maker may seem like a perfect solution, but since no one in our household can ever agree on one flavor (heaven forbid), we always figured it would be a wasted investment...until now.

Check out the Cuisinart ICE-40 Flavor Duo Ice Cream, Frozen Yogurt & Sorbet Maker...yep, it can make two different batches of ice cream at the same time. How "kool" is that? This sleek machine is fully automatic and can produce one or two quarts of frozen dessert in about 20 minutes. Cuisinart boasts the smoothest and creamiest ice cream, frozen yogurt and sorbet with this attractive appliance...all at the touch of a button. Made of heavy grade plastic (available in black or white) and brushed stainless steel, this just might be the ice cream maker we've been looking for. A control switch is easily set to activate both bowls or just one. We love having the option of simultaneously producing either one or two quarts of one flavor, or one quart each of two different flavors. Plus, the machine is easy to clean...a definite requirement in our family.

Making ice cream in the
Cuisinart ICE-40 Flavor Duo Ice Cream, Frozen Yogurt & Sorbet Maker seems like a breeze. Simply stick the double-insulated bowls in the freezer for 6-12 hours, then place them in the base. This is a critical step, since well-chilled canisters and cold ingredients are the key to success with this and any other ice cream maker. Insert the plastic paddles into the machine and place the cover units on. Select the one or two side option, turn on the motor and pour the mix into the unit through the easy pour spout. The plastic covers make it easy to see how the base is coming along. Voila...in about 20-30 minutes, it's time for dessert!

There are definitely a few things to keep in mind when deciding to purchase the
Cuisinart ICE-40 Flavor Duo Ice Cream, Frozen Yogurt & Sorbet Maker. Although it looks pretty sharp with its long, low profile, the dimensions of this machine make it just too large to sit out unless it's being used daily...though that is a possibility with the ice cream fanatics in The Daily Kool household. But most of us should plan on having a place to store it when not in use. Also, we understand that the machine is pretty loud when operating...just something to keep in mind with guests and children who are sensitive to noise. If there's space, it might be easier to just keep the bowls in the freezer all the time for an impromptu craving. Just make sure to keep the bowls in a plastic bag to avoid freezer burn when removing.

We love stuff in our ice cream..nuts, cookie bits, candy, fruit, pickles (just kidding). The
Cuisinart ICE-40 Flavor Duo Ice Cream, Frozen Yogurt & Sorbet Maker says to add any special ingredients in the last five minutes for best results and a truly individual concoction. Only one problem...if the pieces are any larger than a chocolate chip-sized small dice, they can jam up the mixer. This may be fine for the kids, but we adults like chunks in our ice cream...big, big chunks. For us, it'll just be easier to incorporate our mix-ins with a rubber spatula after the ice cream is made. We also prefer a firmer texture with our ice cream, so we will likely transfer the desserts to our beloved Lock and Lock storage containers and place them in the freezer for a couple of hours before enjoying. However, frozen yogurt should be eaten immediately or it might become a bit too hard and lose the smoothness commonly associated with it. The machine does come with a recipe book for ice cream, sorbets, sherbets, frozen yogurts and mixed frozen drinks (with or without alcohol), and there are countless lower-calorie recipes online for the more diet-discerning palette.

For anyone interested in experimenting with different flavors, making sorbet and ice cream at the same time, or simply satisfying everyone in the family with individual tastes, the
Cuisinart ICE-40 Flavor Duo Ice Cream, Frozen Yogurt & Sorbet Maker definitely seems like the way to go. What a pleasure it would be to know exactly what goes into our frozen desserts, eliminate processed ingredients and control the sugar content. Here's an easy recipe for vanilla ice cream that is perfect for kids and those of us who are kids at heart. Enjoy!

Quick and Easy Vanilla Ice Cream

Ingredients
  • 1/2 pint light cream
  • small can of condensed milk
  • 1-2 teaspoons pure vanilla extract (according to taste)
Directions: Place all ingredients in a mixing bowl and mix until smooth. Chill in the refrigerator, then transfer to Cuisinart ICE-40 Flavor Duo Ice Cream, Frozen Yogurt & Sorbet Maker. Freeze according to manufacturer instructions.


Bookmark and Share


Subscribe to The Daily Kool by Email
Thursday, June 25, 2009

Today's Kool Idea: Party on the Go Food & Dessert Travel Caddy with 4 Inserts

Every year, the summer is filled with picnics, barbecues and other casual gatherings for The Daily Kool family. Most of these get-togethers are pot-luck events where everyone brings a dish for the guests to share. Needless to say, tables are always filled with a ton deviled eggs, fruit platters, sandwiches and cupcakes galore. So much for shedding those last few (okay, or forty) pounds...sigh. Since most of us tend to bring homemade items as opposed to pre-made trays, we are always looking for convenient travel caddies to hold our food.

Check out today's special value on QVC...the Party on the Go food & dessert travel caddy with 4 inserts. Seems like a pretty "kool" idea, and just what we need to transport our munchies. The set includes four different interchangeable trays...a travel caddy with lid, cupcake/muffin tray, deviled egg tray, 12" round tray, and veggie/chip and dip tray. These inserts are perfect for customizing the carrier for the type of munchies we're bringing to the party. For about $26 (including shipping), the
Party on the Go food & dessert travel caddy is not a bad deal...The Daily Kool would certainly get our money's worth.

We love that the
Party on the Go food & dessert travel caddy has a lid (complete with handle) high enough to protect our goodies...too often, our food gets mushed on top from covering it with tin foil or plastic wrap. We also like that this product comes in five colors to choose from...we are partial to the purple and blue. Achem, excuse us...lilac and sky. The only thing we're not thrilled with is that the caddy can only accommodate one tray at a time. While we understand this for the food itself, it would be so much more convenient if it included some way to store the extra pieces we're not using at the time. At least all the trays nest together for compact storage when not in use, though.

Despite our little pet peeve about where to put the unused inserts, the
Party on the Go food & dessert travel caddy is certainly worth our order. Our plan is to test it out with our basic (and kid-friendly) deviled eggs for the pool party we're going to next week (see recipe below)...good thing our QVC orders tend to arrive pretty quickly. We even picked up a few extra sets as hostess gifts...we're sure our friends will appreciate how easy it is to create an attractive presentation with this product. The smart and stylish Party on the Go food & dessert travel caddy can be used year-round and certainly seems ideal for any type of casual entertainment...a definite "must have"...at least for The Daily Kool family.


Our Basic Deviled Egg Recipe

Ingredients:
  • 12 hard-cooked eggs, peeled and cut lengthwise
  • 1/2 cup mayonnaise (we like Hellmann's)
  • 1 teaspoon dry ground mustard
  • 1 teaspoon white vinegar
  • 1/4 teaspoon salt
  • 1/2 teaspoon ground black (or white) pepper
  • Paprika for garnish
Directions:
  1. Remove the egg yolks and place into a small bowl, mash with a fork.
  2. Add mayonnaise, mustard powder, vinegar, salt and pepper and mix thoroughly.
  3. Fill the empty egg white shells with the mixture and sprinkle lightly with paprika.
  4. Select the deviled egg tray and place it in your Party on the Go food & dessert travel caddy.
  5. Place deviled eggs in the caddy, cover with lid.
  6. Refrigerate up to one day (but at least one hour) before serving.


Bookmark and Share


Subscribe to The Daily Kool by Email

Thursday, June 18, 2009

Today's Kool Idea: Wendy's Father's Day Frosty Weekend

When we were kids, we often spent the weekend enjoying the surf and sand of the beautiful Florida beaches. Money was tight, and it was the perfect solution for all day entertaining on a budget. Our parents would pack a picnic lunch and we would spend hours making sand castles, searching for seashells and just splashing away in the blue-green waters of the Atlantic Ocean. Then, for an extra special treat, we would stop off at Wendy's for one of their delicious Frosty desserts. Yummy!

The original chocolate Frosty is arguably the best dessert that any fast food chain has ever offered, and has remained a family favorite since Wendy's first opened it's doors in 1969. We actually had the honor of personally meeting Wendy's founder and philanthropist Dave Thomas once, and were saddened by his passing from liver cancer in 2002. A well-known advocate for adoption (he was raised by adopted parents himself), he established the Dave Thomas Foundation for Adoption in 1992. Today, the Dave Thomas Foundation continues to work in partnership with Wendy's to find adoptive families for the 150,000 children in the U.S. and Canadian foster care systems. One of the ways Wendy's supports the Dave Thomas Foundation for Adoption is with their annual Father's Day Frosty Weekend.

This Father's Day weekend, we can all help change the lives of children in foster care, simply by treating ourselves and Dad to a Frosty. Seriously, folks...what's the hardship in that? For every Frosty product sold on Saturday and Sunday, Wendy's will donate $.50 to this worthwhile organization. Last year, more than $1.7 million was raised for the Dave Thomas Foundation for Adoption during Wendy's Father's Day Frosty Weekend....let's do our part (albeit a small one) raise even more this year.

In addition to enjoying the cool and creamy goodness that is a Frosty, there are two other ways you can support the Dave Thomas Foundation for Adoption this Father's Day weekend. Simply create a free Father's Day card on www.frostycard.com, and Wendy's will donate $.25 to the DTFA. You can also buy a Frosty Pinup for $1 at your local Wendy’s to be hung on the wall. 100% of Frosty Pinup Sales will benefit the DTFA.

Though we are fierce loyalists to the original chocolate Frosty, Wendy's has introduced some notable varieties that may interest you. From the vanilla Frosty to the Frosty shake, the Frosty float to the Twisted Frosty, Wendy's has a flavor that is bound to strike everyone's fancy. Make sure to check out Wendy's two new flavors, Frosty-cino and Coffee Toffee Twisted Frosty...even we think they sound divine enough to tempt us away from our classic favorite...nah.

No matter which flavor you choose, you can't go wrong, especially during Wendy's Father's Day Frosty Weekend. So, create your Father's Day eCard today and make sure to bring your family to Wendy's this Saturday and Sunday for a Frosty...you'll be giving them a treat they'll love, while supporting this wonderful cause. Together, we can help children in North America's foster care system find loving homes.


Bookmark and Share


Subscribe to The Daily Kool by Email