Showing posts with label baking. Show all posts

Monday, September 14, 2009

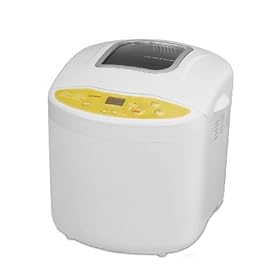
Today's Kool Idea: Breadman TR520 Programmable Bread Maker

Has anyone ever taken a look at the ingredients in a typical bag of bread sold in your local supermarket? Yikes! We shudder just thinking about all of the emulsifiers and preservatives on the nutrition label. Granted, it keeps the price down to a reasonable level and allows us to keep our store-bought bread in the fridge for a lengthy stay without getting moldy. But when it comes down to it, The Daily Kool is a big believer of feeding our family foods with simple ingredients that aren't a struggle to read. Unfortunately, buying healthy (yet expensive) artisan-type bread at the bakery every day is a pipe dream for most of us, especially in today's economy. What's a parent to do?

There is nothing (and we mean nothing) as amazing as the smell of home-baked bread in the morning...and afternoon...and evening. Who are we kidding? We love homemade bread, regardless of when it's made. Okay, so our obsession will clearly never place us on the cover of one of those low-carb diet books. But, we like to think that we get enough fresh fruits and vegetables in our diet to indulge in what we believe to be one of life's most delectable culinary pleasures. We have to admit though, that as adventurous as we are in the kitchen, homemade bread has always been an intimidating process for us. It can take a long time to create a perfect loaf of bread, between mixing the ingredients, kneading the dough, letting it rise (once or twice), punching and kneading again (and again), then finally putting it in the oven to bake. Whew...we could probably use a bread maker.

We have always heard great things about bread makers, but have always resisted the impulse to purchase one for ourselves. We're not quite sure why...well, maybe we do. Have you ever considered what a stress reliever punching and kneading dough is? Think about it. Let's face it though, either our schedules are fuller or we're just getting lazier with age, but we just don't have the time anymore. A bread machine would definitely simplify our lives, especially one that is as reasonably priced as the Breadman TR520 programmable bread maker.

We saw a demo for the Breadman TR520
programmable bread maker on QVC yesterday and were really impressed with how easy it seems. They made a big deal about the cost, but with shipping, it winds up only being a couple of dollars less expensive than the one featured on Amazon. Regardless, for the typical family, this an absolute bargain at under $60, especially compared with others on the market. If eight functions with 39 programmable options weren't enough, the Breadman TR520 has a host of other features that we love. The digital display with viewing window also includes a crust color control, one-hour warm cycle and (our favorite) a 13-hour delay timer. Imagine putting the ingredients in your bread machine before you go to sleep and waking up to a luscious aroma in the morning...not that we are ever able to get 13 hours of sleep in one night (don't we wish), but that's just us being fickle about it. Add a fruit and nut add-in beep, a recipe booklet and a viewing window to keep tabs on our creations (yes, we're anal), and we've got everything we need to bake a perfect loaf of homemade bread.

The biggest complaint that we have come across with the
Breadman TR520 is that the digital display is kind of hard to read. What the company's executives were thinking when they put white lettering on a yellowish beige panel is anyone's guess. Maybe there was something in the yeast that day, but it was really a pretty dopey move on their part. Also, watch out for the kneading paddle...it is likely to come out of the machine with your bread. Oh, and make sure to put your Breadman TR520 far enough back on the counter so it doesn't "walk" off and smash itself to bits. Overall, the issues seem pretty minor for what you're getting with this great machine. The Breadman TR520 programmable bread maker is clearly a convenient and practical way to create yummy loaves that are affordable and healthy for the entire family. How "kool" is that?


Bookmark and Share


Subscribe to The Daily Kool by Email

Tuesday, August 25, 2009

Today's Kool Idea: Done Right Multiple Cook Time Kitchen Timer

Fall is a busy time for The Daily Kool family. This is the time of year that we celebrate the season with large dinner parties. Oh, and we invite everyone! Ah, yes...food is definitely the catalyst that brings us all together. Always has been. It's nothing for us to expect 30-40 guests in our admittedly small home for an elaborate dinner. Over the past ten years of our marriage (yikes!), our household has truly become the destination for meals galore. We only have one rule...no one brings food. Bottles of wine? Sure. Soda? Absolutely. The food though, is our domain, and we always look forward to testing out new and exciting dishes on our more than willing company. Have we mentioned how much we love to cook?

We live for the moment when our guests marvel at the sheer genius of our culinary skills...not that it happens often. Okay, we admit it...we always mess a couple of things up with every dinner. We have so many dishes in various stages of preparation, cooking and plating, at least a few of them always fall through the cracks. Over-boiled soup, scorched veggies, mushy risotto and dry (we sometimes forget to baste) turkey are just a few examples of the disasters we've encountered over the years. It's not easy staying on top of everything all at once.

Thank goodness for our cousin. Last time she came over, she gave us this absolutely adorable Done Right multiple cook time kitchen timer as a hostess gift. Check it out...there are five (count them) separately functioning timers in one oven-shaped package. Each of the five timers gives off a sound flashes with a light when ready. This little guy is just what we need to stay on track! We love how we can correspond the stove top timers with each of our burners, while the front timer reminds us when to check the oven. We were actually amazed how easy the
Done Right timer was to program, even for us technically inept folks. Just press the 1 or 5 minute increment button until the desired time is reached and press start...it's that simple. Seriously, how great is this little gadget? And, why didn't we think of it first, darn it?

There are a couple of things that we've noticed with our own
Done Right multiple cook time kitchen timer that we wanted to pass along. First off, the alarm itself is fairly low, which is why they've added the flashing light component, we suppose. It would have been nice to have a volume adjustment option. Honestly though, it's not much (if at all) lower than our regular oven timer. Plus, one of us is always in the kitchen, so it's not particularly a problem for us. Also, we always use the company's suggestions for prolonging battery life. When we aren't cooking up a storm, we remove one of the four AA batteries, and usually make sure to stop the flashing light before its one-minute automatic shut off. You can find this kitchen timer at several websites, including Amazon, Target and Walmart. Our research though, shows that QVC seems to currently have the best price at just under $20 (plus shipping)...this the the main link we've provided throughout the post.

We love our
Done Right multiple cook time kitchen timer so much, we leave it out on our stove top, even when we're not using it. Sure, it's a little larger than your standard kitchen timer, but talk about a fabulous conversation piece. What a wonderful novelty gift for anyone who spends oodles of time in the kitchen...particularly those of us who need a little help with the orchestration and execution of our larger dinner parties. Form and function are definitely the right combination with this super "kool" idea. Of course, we've just eliminated our best (and most plausible) excuse for a not-so-perfect meal. Aargh...the pressure!


Bookmark and Share


Subscribe to The Daily Kool by Email

Tuesday, July 21, 2009

Today's Kool Idea: Lehman's Best Cherry Pitter

One of the most wonderful things about the summer is the abundance of fresh Bing cherries. Dark and sweet, this cherry is one of our all-time favorite fruits. We've been known to go through bushels of them in a sitting. Another funny story about our older brother growing up (we've told a few of them!)...our grandmother somehow convinced him that if he ever swallowed a pit, a real cherry tree would grow in his tummy. Talk about traumatizing a child...gotta love it, especially as a younger (and often tortured) sibling! Hence, our poor brother, though he loved them, hardly ever ate cherries for fear of what would happen...what a wuss!

Our children also love cherries, but have no qualms about recruiting us for cherry pit removal. So, being the ever loving parents that we are, we spend lots and lots of time sitting in front of the television hand-pitting cherries with our sharpest paring knife. Anyone who has kids can probably appreciate our misery. Dissecting cherries one at a time by hand is...well, the pits. There has to be a better way, and so we just decided that it might be time to find ourselves a cherry pitter.

After doing a bunch of research, it looks like Lehman's Best Cherry Pitter is just that...the best. The company boasts how effective it is at removing pits quickly without bruising or crushing the cherries...we're all for less mess and no wasted fruit! It's actually pretty reasonably priced at around $35 also. Basically, the stainless steel punch rod forces the pit through a gasket into the see-through waste container, then automatically lifts the cherry and drops it into the bowl. We love being able to place several cherries into the feed tray, instead of handling them one at a time. Imagine effectively pitting dozens of cherries in just minutes..what an amazing time saver. Plus, the parts are dishwasher safe...who could ask for more?

There is only one possible catch that we can envision with
Lehman's Best Cherry Pitter. It's unreasonable to expect perfection each and every time, so we can imagine a cherry or two sneaking into our bowl unpitted. And, assuming that each pitted cherry really does come out whole and virtually undamaged as the company claims, it might be easy to miss a particular cherry that still has a pit inside. Not a huge problem when just eating cherries for their simple enjoyment, but definitely a consideration when baking fresh pies and cobblers for dinner guests. So, we'll just have to put out a small disclaimer, and pray that everyone's dental work is up to date.

Regardless,
Lehman's Best Cherry Pitter is worth the risk of an occasional escapee. We'll probably keep a pretty close eye on the hopper to make sure each pit does indeed come out. The best part? This pitter looks safe and easy enough for children to use. Anyone who reads our blog knows we're always looking for ways to put our kids to work...under the guise of fostering independence, of course (sneaky, sneaky)! Ideal for canning, freezing, dehydrating and baking, Lehman's Best Cherry Pitter is a definite "kool" idea for enjoying one of the summer's sweetest treats.

Refreshingly "Kool" Cherry Soup Recipe

Ingredients:
  • 1/4 lemon, peeled and seeded
  • 1 3/4 cups water
  • 1/2 cup sweet red wine
  • 2 cups pitted sweet cherries
  • 1/4 cup sugar
  • 1/4 teaspoon cinnamon
  • 1 1/2 teaspoons cornstarch
Directions:
  1. Chop peeled and seeded lemon into small pieces and blend with water until it forms a smooth pulp.
  2. Put the lemon pulp, cherries, sugar and cinnamon in a medium, heavy-bottomed saucepan. Bring to a boil, then reduce heat and simmer for about 5 minutes.
  3. Dissolve the cornstarch with a little water and add with the red wine to the soup mixture.
  4. Stir constantly over low heat until slightly thickened.
  5. Cool to room temperature in an ice-water bath, then chill for at least 30 minutes in the refrigerator.
  6. Remove cherries with a slotted spoon and blend until coarsely chopped.
  7. Stir the cherries back into the soup mixture and serve.


Bookmark and Share


Subscribe to The Daily Kool by Email

Friday, July 17, 2009

Today's Kool Idea: Nordic Ware Ice Cream Cone Cupcake Baking Pan

What better way to celebrate the end of our National Ice Cream Month week-long feature than with cake? Or should we say cupcakes? The Daily Kool family is headed out to a friend's house for dinner together tonight...of course, we're in charge of the dessert (we have a bit of a reputation). Since there's going to be a pretty large group of kids at the house, we thought it might be fun to do something a little different for them.

Take a look at this adorable ice cream cone cupcake baking pan from Nordic Ware. Since we are always on the lookout for unusual novelty pans, we're pretty excited about this one. Do these cupcakes look just like ice cream cones, or what? Gotta love that Nordic Ware! We really love the detail of this pan. Constructed of heavy cast-aluminum, it is non-stick coated for easy cake removal and clean up. Plus, since the pan measures 3" deep and 10.5" across, it will produ
ce six nice size, cone-shaped cupcakes at one time.

Our creative juices are really flowing with possibilities with the Nordic Ware ice cream cone cupcake baking pan, but we're keeping it pretty simple for tonight's event. We're going to bring several cans of Betty Crocker easy flow icing and some sprinkles to make the "ice cream" to top our cupcake cones. The kids can sit down and decorate to their hearts' content. We'll also bring along a couple of containers of real ice cream...our local supermarket has a "buy one, get one free" special going on this week. The kids can top their cupcakes with ice cream instead of the frosting, or maybe we'll just give each of them a plate and put a scoop on the side so they can have it all...yep, that's probably the way we'll go.

As with all high quality baking pans, we strongly recommend hand-washing this one. Hey, superior baking comes at a superior price (around $35), so we'd prefer our pans to last forever. Also, make sure to grease the Nordic Ware
ice cream cone cupcake baking pan very well to avoid stickiness. With so many intricate details to create the realistic effect, even a non-stick coating just isn't enough. Pam baking spray with flour (found in your local supermarket) always gives us excellent results. Experiment with a boxed cake mix first...it's easier, kids love it, and it tends to have the great consistency for beginners with these kinds of pans.

It's just too bad we can only make six cupcakes at a time...we'll be spending most of the day in the kitchen baking. But, with this super "kool" Nordic Ware
ice cream cone cupcake baking pan, we are absolutely going to be the hit of the party tonight. Yeah we know we're showoffs, but seriously...how could we resist?


Bookmark and Share


Subscribe to The Daily Kool by Email

Tuesday, July 14, 2009

Today's Kool Idea: Chef's Choice 838 Waffle Cone Express Ice Cream Cone Maker

Nothing says summer quite like an ice cream cone. Some of our best childhood memories include strolling down the boardwalk by the beach with our parents, eating ice cream cones while watching the ocean waves crash against the shore. We could never quite understand how anyone could dishonor the sanctity of ice cream by eating it out of a cup. Good thing we've never quite grown up...as adults, we still love our ice cream cones, even when the sticky mess drips down the side of our arms. Waffle cones help us stay a bit cleaner...not that we care much. We just love them because they are so darned yummy!

At The Daily Kool, we have a bit of a dilemma when it comes to addictions like these. Our taste buds require easy and immediate access for those occasional (okay, frequent) cravings, but our inherent laziness prevent us from taking more trips to the ice cream parlor to satisfy them. Plus, the cost definitely adds up! Sure, ice cream cones are available at our local supermarket, but have you ever read the ingredients in those things? Too many unpronounceable words for us...blech.

Take a look at the Chef's Choice Waffle Cone Express ice cream cone maker. Seriously, folks...nothing beats the incredible aroma and freshness of a home-baked waffle cone. This ice cream cone maker features an advanced professional baking system that delivers homemade, freshly baked sugar cones in about two minutes. Yes, you heard us right...two minutes. Who could resist that temptation? Like your ice cream cone crispier than the average aficionado? No problem...a color-control dial makes that personal browning preference easy to select. An instant temperature recovery feature allows for continuous baking..cone after cone. The unique locking latch function with easy-clean overflow channel ensures each ice cream cone will be uniform in thickness for perfect results each and every time. Plus, the built-in cord storage compartment makes it convenient to keep the
Chef's Choice Waffle Cone Express ice cream cone maker in a space saving, upright position.

A plastic cone-rolling form is included with the
Chef's Choice Waffle Cone Express ice cream cone maker. Illustrated instructions and detailed recipes make it easy to become a master ice cream cone maker in no time. We love how the recipes use everyday ingredients we typically keep stocked in our pantry, and our creative juices are already flowing with several possible variations. Chocolate dipped sprinkle cones, waffle cups, cookies and even cannolis...our waistlines are expanding as we speak! Just be careful when rolling the ice cream cone...it has to be done when it's hot or it won't form properly. Also, make sure to pinch the end properly to prevent ice cream from leaking out...pouring some melted chocolate in the bottom of the cone is an easy (and tasty) solution. Though it has a non-stick coating, we recommend spraying or brushing the Chef's Choice Waffle Cone Express with a little oil before use to make it that much easier.

The
Chef's Choice Waffle Cone Express ice cream cone maker is a great way to enjoy the crunchy sweetness of this sugary treat, straight from the kitchen. It's available all over, but we found the best deal at Bed Bath and Beyond with our 20% coupon...just go to the store to save on shipping, or type in your coupon code online. For about the price of a couple of trips to the ice cream parlor, you can produce delectable, edible delights that are sure to impress each and every time. Friends and family will be amazed at your culinary genius, never guessing how "kool" and easy it is...that's okay, we won't tell if you don't.

Basic Gourmet Waffle Cone

Ingredients:
  • 1 whole egg
  • 1 egg white
  • 1/4 tsp. salt
  • 1/2 cup granulated sugar
  • 2/3 cup sifted all-purpose flour
  • 2 tbsp. butter, melted and cooled slightly
Directions:
  1. Preheat the Chef's Choice Waffle Cone Express. Start with Color Control setting of 2 1/2 to 3, but change as necessary for best results.

  2. Beat the egg, egg white and salt in a small bowl with a fork or hand-held mixer until well blended. Beat in the sugar and beat until sugar is incorporated and the egg has lightened in color slightly, about 1 minute. Add flour and beat another 15 seconds or until incorporated and all lumps are gone. Add the melted butter and stir until well blended.

  3. Spoon 2 tablespoons (1 ounce) of batter in the center of the iron. Bake for 1 minute then check for proper color. Cook an additional 5 to 10 seconds if necessary.

  4. Quickly remove the waffle from the WaffleCone Express™ onto a clean cloth towel. If the waffle is too hot to handle with your bare hands, use the cloth to help lift and roll the waffle around the cone form. Hold the cone a few seconds to set its shape then place on a wire rack to cool.
Makes about 8 ice cream cones.


Bookmark and Share


Subscribe to The Daily Kool by Email

Thursday, June 25, 2009

Today's Kool Idea: Party on the Go Food & Dessert Travel Caddy with 4 Inserts

Every year, the summer is filled with picnics, barbecues and other casual gatherings for The Daily Kool family. Most of these get-togethers are pot-luck events where everyone brings a dish for the guests to share. Needless to say, tables are always filled with a ton deviled eggs, fruit platters, sandwiches and cupcakes galore. So much for shedding those last few (okay, or forty) pounds...sigh. Since most of us tend to bring homemade items as opposed to pre-made trays, we are always looking for convenient travel caddies to hold our food.

Check out today's special value on QVC...the Party on the Go food & dessert travel caddy with 4 inserts. Seems like a pretty "kool" idea, and just what we need to transport our munchies. The set includes four different interchangeable trays...a travel caddy with lid, cupcake/muffin tray, deviled egg tray, 12" round tray, and veggie/chip and dip tray. These inserts are perfect for customizing the carrier for the type of munchies we're bringing to the party. For about $26 (including shipping), the
Party on the Go food & dessert travel caddy is not a bad deal...The Daily Kool would certainly get our money's worth.

We love that the
Party on the Go food & dessert travel caddy has a lid (complete with handle) high enough to protect our goodies...too often, our food gets mushed on top from covering it with tin foil or plastic wrap. We also like that this product comes in five colors to choose from...we are partial to the purple and blue. Achem, excuse us...lilac and sky. The only thing we're not thrilled with is that the caddy can only accommodate one tray at a time. While we understand this for the food itself, it would be so much more convenient if it included some way to store the extra pieces we're not using at the time. At least all the trays nest together for compact storage when not in use, though.

Despite our little pet peeve about where to put the unused inserts, the
Party on the Go food & dessert travel caddy is certainly worth our order. Our plan is to test it out with our basic (and kid-friendly) deviled eggs for the pool party we're going to next week (see recipe below)...good thing our QVC orders tend to arrive pretty quickly. We even picked up a few extra sets as hostess gifts...we're sure our friends will appreciate how easy it is to create an attractive presentation with this product. The smart and stylish Party on the Go food & dessert travel caddy can be used year-round and certainly seems ideal for any type of casual entertainment...a definite "must have"...at least for The Daily Kool family.


Our Basic Deviled Egg Recipe

Ingredients:
  • 12 hard-cooked eggs, peeled and cut lengthwise
  • 1/2 cup mayonnaise (we like Hellmann's)
  • 1 teaspoon dry ground mustard
  • 1 teaspoon white vinegar
  • 1/4 teaspoon salt
  • 1/2 teaspoon ground black (or white) pepper
  • Paprika for garnish
Directions:
  1. Remove the egg yolks and place into a small bowl, mash with a fork.
  2. Add mayonnaise, mustard powder, vinegar, salt and pepper and mix thoroughly.
  3. Fill the empty egg white shells with the mixture and sprinkle lightly with paprika.
  4. Select the deviled egg tray and place it in your Party on the Go food & dessert travel caddy.
  5. Place deviled eggs in the caddy, cover with lid.
  6. Refrigerate up to one day (but at least one hour) before serving.


Bookmark and Share


Subscribe to The Daily Kool by Email

Thursday, June 4, 2009

Today's Kool Idea: Folding Island Kitchen Cart With Butcher Block Top

The Daily Kool kitchen is pretty small. It's one of those longer, narrower styles that doesn't exactly lend itself to more than one person at a time. Bottom line....we always seem to be running out of room, especially when we are cooking and preparing for company. Oh, how we wish our kitchen was large enough to have a big, beautiful island in the center of it!

When we saw this folding island kitchen cart with butcher block top on QVC a few months ago, we knew we absolutely had to buy one. What an attractive piece of functional furniture! We admit that the $190 price tag gave us a quick pause, but the free shipping and easy pay option convinced us to call and order it anyway. We have to tell you...it was so worth the purchase.

The folding island kitchen cart is not for the faint of heart...the durable hardwood construction with a natural finish and stainless steel frame makes this a really solid, sturdy and yes, quite heavy piece. The butcher block top can handle up to 80lbs while each of the other two tiers hold up to 30lbs each. In case you were wondering, the kids each loved the ride around the living room we gave them on it...definitely not recommended, but fun nonetheless. We love that it came beautifully packed and completely assembled. The company has certainly put a lot of thought and handy features into this product, including two stainless steel side towel bars with six movable hooks, a wine glass rack (under the butcher block top) and a removable three-bottle wine caddy. Plus, the caster wheels are super convenient...they swivel for easy steering and lock in place to help ensure stability. The best part? Although the folding island kitchen cart boasts nine-square feet of work space, it collapses down to a mere 5 1/2 inches wide for easy storage. We keep ours in that extra space between the refrigerator and the wall when we're not using it...although, the piece is definitely lovely enough to keep on display all the time if you have the room.

We have found so many uses for our folding island kitchen cart, but it's most often an extra space for food preparation in The Daily Kool household. The 36" height is perfect for the kids, providing an area where they can help without being in the way. When we have company, often use the folding island kitchen cart to bring all the hot food out at the same time...then it becomes our beverage station, making more room on the table for the food we've just served. Be careful, though...like with all quality wood furniture, make sure you don't slice vegetables or put hot dishes directly on the butcher block surface and tiered shelves...if you protect it with a cutting board and trivets, the folding island kitchen cart will undoubtedly last for many, many years.


Bookmark and Share


Subscribe to The Daily Kool by Email

Friday, May 22, 2009

Today's Kool Idea: Baker's Edge Nonstick Edge Brownie Pan

Every week, we try to spend a little time in the kitchen, fostering our love for baking. Lately, The Daily Kool family has become obsessed with baking the perfect brownie. You know which one we're talking about...moist and extravagant truffle-like brownies that have a crackly top, yet are tender with slightly chewy edges. Yum. A perfect edge is the pride and joy of any brownie baker, yet is often unattainable with a standard brownie baking pan.

Baker's Edge Nonstick Edge Brownie Pan is definitely not standard...but, it has certainly exceeded it! Look at how "kool" this gourmet baking pan is...its award-winning design has these patented sidewalls that circulate heat more evenly throughout the pan. No more mushy middles, and every individual serving boasts two perfect edges...fabulous if you're an edge family like we are. These days, we expect all high quality bakeware to have a premium nonstick coating for easy removal, and the Baker's Edge Nonstick Edge Brownie Pan does not disappoint (though we tend to grease our pans regardless). We love the recessed handles that make it easy to turn the pan upside down
, but also appreciate the flexible nylon spatula the company has provided in case we want to take just one piece.

The Daily Kool simply does not believe in investing in a one-dish wonder. So, it's nice to know that the Baker's Edge Nonstick Edge Brownie Pan has been designed to fit all 9" x 13" recipes. Not only is it great for brownie, cookie bar and cake mixes...but, we can also use it for most of our casserole recipes. The company is coming out with a nonstick edge lasagna pan in the near future, but we actually plan on trying this dish out in the brownie pan...should be fine for a family of four. Plus, the Baker's Edge Nonstick Edge Brownie Pan is oven safe up to 500 degrees and broiler safe for even browning. Keep in mind that the interior volume is sized to accommodate approximately 11 cups, so make sure to plan your recipes accordingly. And, please do not put the Baker's Edge Nonstick Edge Brownie Pan in the dishwasher...in fact, all bakeware, regardless of whether it's dishwasher safe, will last much longer if hand-washed.

If there is one thing we've learned about kitchen items, never skimp on bakeware, and always get the highest quality your budget can possibly afford. It might seem a little extravagant, but indulge yourself with Baker's Edge Nonstick Edge Brownie Pan...and the reward will pay for itself in the years to come. This pan makes a fabulous gift for the home baker, and is bound to become a staple in your own kitchen. Now that we've completely worked up our appetite, we've shared our favorite brownie recipe for you below. Enjoy!

Cocoa Fudge Brownies

Ingredients for Brownies:
  • 1 cup of unsalted butter, melted and cooled
  • 1 cup granulated sugar
  • 1 cup firmly packed brown sugar (we use light brown, but either is fine)
  • 3 eggs
  • 2 teaspoons vanilla extract
  • 3/4 cup unsweetened cocoa powder, sifted
  • 1 cup all-purpose flour
  • 1/4 teaspoon salt
  • 1/4 teaspoon baking soda
  • 1 cup chopped walnuts, optional (but no brownie is the same without them!)
Ingredients for Frosting:
  • 2-3 cups confectioner's sugar, sifted
  • 1 cup unsweetened cocoa powder, sifted
  • 1/2 cup (1 stick) unsalted butter, slightly softened
  • 1/2 teaspoon vanilla extract
  • 3-6 tablespoons warm water, as needed.
Directions:
Brownies: In a bowl, blend the melted butter and the sugars together. Blend in the eggs, vanilla, cocoa powder, flour, salt, baking soda and nuts (if using) in that order to make a smooth batter. Spoon the batter into the prepared baking pan. Bake for about 25 minutes, or until the middle is just set and does not seem wet and jiggly when touched. Check the brownies after 20 minutes so you do not overbake them (depends on how your oven cooks). Cool thoroughly in the pan.

Frosting: In a bowl, combine the confectioners sugar with the cocoa. Add the butter and cream with the dry ingredients. Add the vanilla and water as required to make a fluffy, spreadable frosting. Frost the completely cooled brownies and refrigerate for at least 30 minutes before cutting and serving. We prefer to eat our brownies cold, right out of the fridge.


Bookmark and Share


Subscribe to The Daily Kool by Email

Friday, May 8, 2009

Today's Kool Idea: EatSmart Precision Pro Digital Kitchen Scale

Well, judging by the weather, summer is definitely just around the corner here at The Daily Kool, and boy, are we in big trouble. Bathing suit season is almost here, and we have totally been neglecting our healthier eating habits these past few months...yikes! Time to get back on track and start watching what we eat. Thank goodness we have The Biggest Loser finale coming next Tuesday for inspiration. Those contestants are amazing...an absolute inspiration to everyday people like us who want to improve our health and increase longevity. And, while The Biggest Loser contestants have had many tools at their disposal to help them shed those extra pounds, one of the most important has undoubtedly been an old standard...a kitchen scale.

Believe it or not, there are several features you should consider when purchasing a kitchen scale. Capacity, precision and price are our top three. There are so many choices for a kitchen scale on the market today...The Daily Kool believes that no one does it better than EatSmart. For our home, the EatSmart Precision Pro digital kitchen scale is hands-down one of the best investments we've ever made...and it definitely gets more of a workout than we ever do (unfortunately...sigh).

With an 11lb capacity, amazing accuracy and approximate $25 price tag, the
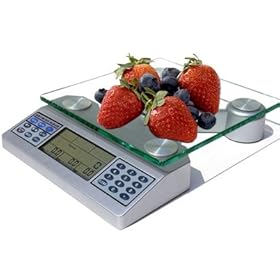
EatSmart Precision Pro digital kitchen scale is a terrific value. It is compact, yet the extra large LCD display makes it easy to read...plus, it's attractive enough to keep on our kitchen counter. We love the tare (zero) feature which allows us to automatically subtract the weight of a plate or container holding our food. Even better, it uses standard AAA batteries (as opposed to the more expensive CR2032 button ones) which we always have lying around the house. Add the four measurement mode (grams, ounces, kilograms and pounds) and a stable platform with five rubber feet to eliminate sliding, the EatSmart Precision Pro is a simple, yet effective digital scale for any kitchen. The only problem we've ever had with this product is when we want to measure ingredients in an extra large bowl or plate. They will partially cover the display, making it a little difficult to read...this is such a minor issue, though, it's hardly worth mentioning (but we will anyway, of course).

Not only is the
EatSmart Precision Pro digital kitchen scale invaluable as a tool for measuring food for weight management, but it is an absolute must have for any home baker. Precise measurements are the difference between success and failure in baking. Dry ingredients such as sugar and flour should always be measured with a kitchen scale, instead of standard measuring cups. There are too many variables (air pockets, compression, etc) that can intefer with pastry perfection...regardless of how much flour you get into your scoop, you can ensure better accuracy with a quality digital kitchen scale like the EatSmart Precision Pro.

Though the EatSmart Precision Pro digital kitchen scale is perfect for our household needs, the company has taken technology one giant step further with their latest innovation. In addition to traditional food measurement, the EatSmart Digital Nutrition scale also analyzes the nutritional content of ANY food by portion size, and is the only scale on the market that allows you to calculate nutrients for any food with a USDA Nutrition Facts label. For those of us who need a more comprehensive educational and behavioral modification tool, the EatSmart Digital Nutrition scale is definitely worth checking out.

Healthy eating choices, regular exercise and controlled consumption are the keys to proper weight loss and management. We never have to guess about portion sizes with our EatSmart Precision Pro digital kitchen scale. Putting our food on this scale today will help keep us off The Biggest Loser one in the future. Summertime, here we come!


Bookmark and Share


Subscribe to The Daily Kool by Email

Thursday, April 23, 2009

Today's Kool Idea: Junior's Cheesecake Cookbook

Picture the perfect dessert in your mind...rich taste, creamy texture and oh so decadent. For us at The Daily Kool, nothing finishes a meal quite like a delicious slice of cheesecake. And nobody does cheesecake better than Junior's. Don't get us wrong...we like The Cheesecake Factory just as much as the next person. But if you've ever tasted a cheesecake from Junior's in Brooklyn, New York, you undoubtedly agree with us that there's just no comparison. Junior's Cheesecake is almost worth moving back to the city for, but alas New York is another time, another life for The Daily Kool family.

So what do we do when we need our Junior's cheesecake fix? Well, up until about a year ago, we merely settled for meritocracy at best. And although Junior's ships all over the U.S., the cost for delivery was just too extravagant, even for us cheesecake addicts. So, imagine our excitement when we came across this fabulous Junior's Cheesecake cookbook. It seemed like the perfect solution, especially since we love fooling around in the kitchen...wait, that didn't come out right, did it? Ahem...well, you know what we meant!

This Junior's Cheesecake cookbook lives up to it's name...50 to-die-for recipes for New York style cheesecake. These are no ordinary recipes, folks! Imagine tantalizing your tastebuds with enticing cheesecake flavors such as Heathbar, Black Forest, Banana Fudge and White Chocolate Cranberry, just to name a few. We love the old-fashioned red and white striped cover, glossy pages and quality photography. We know, we know...baking cheesecakes can be very intimidating, especially with their propensity for cracking. But, the Junior's Cheesecake cookbook is filled with sidebars of hints and suggestions to ensure perfectly smooth and incredibly delicious results.

While we appreciated the thorough instructions in the Junior's Cheesecake cookbook, we have to admit to being a bit overwhelmed with the detail at first. That said, their techniques for successful preparation, baking, cooling and cutting ensure top-notch results...albeit with a little practice and experimentation. However, any imperfections (mostly cosmetic) were anticipated by the Junior's team and addressed in the handy trouble-shooting section in the cookbook...and none of our issues affected the incredible taste of our creations. Mmmmm...scrumptious! We did make sure to thoroughly read through the entire book before attempting our first cheesecake, just to make sure we understood the basics. We also took all of Junior's pan and ingredient recommendations to heart...highest quality products yield the best results.

Our Junior's Cheesecake cookbook has become a staple in The Daily Kool household and is a great gift for anyone who likes baking, or just loves cheesecake. These are definitely time consuming recipes, but the results are oh so worth it! Good thing our closets are stocked with elastic waist-band pants, huh?

Here's the recipe from the book for original New York style cheesecake for your baking pleasure...enjoy!

Ingredients:
  • 1 recipe crust of your choice*
  • four 8oz. packages full-fat (this is important) cream cheese at room temperature
  • 1 2/3 cups sugar
  • 1/4 cup cornstarch
  • 1 tablespoon pure vanilla extract
  • 2 extra-large eggs (this is important)
  • 3/4 cups heavy cream

Directions:
  1. Preheat oven to 350 degrees. Generously butter the bottom and sides of a 9-inch springform pan. Wrap the outside with aluminum foil, covering the bottom and extending all the way up the sides. Make and/or bake your crust and leave it in the pan.
  2. Beat one package of cream cheese, 1/3 cup of the sugar and the cornstarch together on low until creamy (about 3 minutes), scraping down the bowl several times. Blend in the remaining cream cheese, one package at a time, continuing to scrape as needed.
  3. Increase the mixer speed to medium and beat in the remaining 1 1/3 cups of sugar and vanilla. Blend in the eggs, one at a time, beating well after each one. Beat in the cream until just completely blended....DO NOT OVERMIX. Gently spoon batter over the crust.
  4. Place the cake in a large shallow pan containing hot water that comes about 1 inch up the sides of the springform pan...this water bath will help prevent cracking and ensure a creamy texture.
  5. Bake until the slightly golden tan (about 1 1/4 hours). Remove the cheesecake from the water bath, transfer to a wire rack and let cool for two hours.
  6. Leaving the cake in the pan, cover loosely with plastic wrap and refrigerate overnight.
  7. Make sure to keep cake refrigerated until ready to serve and slice with a sharp straight-edge knife (not serrated).
*The Junior's Cheesecake cookbook includes a fabulous recipe for their sponge cake crust. In the meantime, feel free to make your own graham cracker or oreo crust.


Bookmark and Share


Subscribe to The Daily Kool by Email

Tuesday, April 7, 2009

Today's Kool Idea: Passover Matza 101 Cookbook

Okay, by now our fans should all be aware of The Daily Kool's obsession with food. If not, you haven't been reading our stuff! Call us crazy, but we particularly like the challenge of cooking for the Passover holiday. It's not as easy as you would expect, especially since many traditional ingredients (bread, flour, legumes, etc.) in our recipes are forbidden during Passover. After all, how creative can we really get with matzoh?

That's just the question neighbors Jenny Kdoshim and Debbie Bevans asked when they wrote Matza 101. This innovative cookbook takes an original approach to Passover recipes, with matzoh as the main ingredient. We like that this hardcover book has a spiral binding, making it easy to stay on the right page. We also appreciate how detailed the directions are, making each recipe virtually foolproof. In Matza 101, the authors demonstrate an simple process which enables the home cook to manipulate matzoh, resulting in endless possibilities in the kitchen. The procedure is to basically dampen the matzoh until it reaches an al-dente, lasagna noodle-type texture. Please be aware that it may take a little practice to perfect, but when you do...watch out! Can you imagine the possiblities now?

Passover is a particularly difficult holiday for many children with finicky pallettes. Matza 101 has truly guided us in creating delectable dishes that even our kids love. A particular favorite were the Matza Mini Franks...simple, but oh so yummy! Another winner in our household is the recipe for Matza Veggie Calzones. We have sampled many recipes from this amazing cookbook. This year, we are going to try our hand at Chicken Pot Pie. From baklava and cannolies to knishes and gefilte fish enchiladas, Matza 101 has given our family a smorgasbord of delicious recipes that have to be tasted to be believed. We have given you a recipe to try out, courtesy of Matza 101...the only modification that we have made is to use jarred pasta sauce as a time-saver. Though it doesn't compare to homemade, it does simplify the recipe for the beginning Passover cook. Enjoy, and have a wonderful holiday!

Matza Cheese Lasagna

Ingredients:
1-2 jars of pasta sauce (3-4 cups, depending on preference)
6 sheets of matzoh
2 cups of cottage cheese
2 cups of ricotta cheese
2 1/2 cups shredded mozzarella cheese
1 cup grated parmesan cheese
1 egg, beaten
pinch of nutmeg
1/2 to 1 teaspoon black pepper (or to taste)
1/4 cup chopped fresh italian parsley

Directions:
  1. Preheat oven to 350 degrees F.
  2. Set aside 1/2 cup EACH of the mozzarella cheese and parmesan cheese.
  3. Mix all of the other above ingredients in a bowl, except the matzoh and sauce.
  4. Grease a lasagna pan (with a little oil or cooking spray) and place some of the pasta sauce in the bottom.
  5. Cover the bottom of the pan with two sheets of matzoh side by side.
  6. Top the matzoh with 1/3 cup ofthe cheese mixture, and top with about 1 cup of sauce.
  7. Repeat the layering and end with the sauce.
  8. Top with the reserved mozzarella and parmesan cheeses.
  9. Place in oven and bake for about 45 minutes or until melted and bubbly.


Bookmark and Share


Subscribe to The Daily Kool by Email

Tuesday, March 31, 2009

Today's Kool Ideas: Wilton 3-D Cake Pans (Lamb, Bunny, Egg)

We at The Daily Kool are suckers for unusual baking molds. Imagine our joy in finding three super "kool" 3-D cake pans to share with our readers for our Easter week...a Stand Up Lamb Pan, 3-D Bunny Pan, and 3-D Egg Pan Set. This is a wonderful baking project to do with the kids or on your own.

We were thrilled to see that these 3-D cake pans were made by one of our personal favorite bakeware companies, Wilton. Wilton is an industry leader in cake decorating, quality bakeware and food crafting. They are the number one resource for nationally-located decorating classes, and proven supplier of professional Wilton decorating bakeware. Their website gives some great ideas with clear, step-by-step instructions to ensure success, even for the amateur baker.

Check out this adorable Stand Up Lamb Pan! An especially sweet addition to Easter festivities, the lamb cake is fun and easy to make using Wilton's Stand Up Lamb Pan. The two halves of the pan fill with six cups of pound cake or another firm textured batter and bake without the need for a heating core. Contoured for realism, they produce a life-like lamb with long ears and a little snout nestled in a laying position. The Stand Up Lamb Pan comes with five decorating suggestions, or use your imagination to design your own. Measures 10 by 4-1/2 by 7 inches.


Peter Rabbit is a welcome guest at any Easter or other springtime event! This precious 3-D Bunny Pan is sure to impress. The two-piece set fills with 4-1/2 cups of pound cake or another firm textured batter and bakes without the need for a heating core. Contoured for realism, the pan produces a lifelike bunny with long ears and plump cheeks nestled in a sitting position. The 3-D Bunny Pan also comes with five decorating suggestions. Measures 7-1/4 by 7 by 4 inches.


The 3-D Egg Pan Set is The Daily Kool personal favorite. A lovely addition to a spring holiday table, this egg-shaped cake is fun and easy to make using Wilton's 3-D Egg Pan Set. The four-piece set includes two oval halves and two ring bases to keep the pans level in the oven. Simply fill the halves with any two-layer cake mix and bake, then flip one cake on top of the other and decorate. Yep, you guessed it...the 3-D Egg Pan Set comes with five decorating suggestions but has infinite possibilities. Measures 6.2 x 6.3 x 8.8 inches.


All three bakeware sets are crafted of quality aluminum for even heating and long-lasting durability. We do not recommend putting these pans in the the dishwasher, though...they will hold up better if you hand-wash them. Also, we have found that many of the 3-D cake pans have stickiness issues, so make sure to grease them very well when baking...we personally use Pam baking spray with flour (found in your local supermarket) with excellent results. Make sure you do a practice run before making any of these 3-D cakes for company...it's always a good idea to get the kinks out. We also suggest experimenting with a boxed cake mix first...they are likely to have the best consistency for 3-D cake pan beginners. Another idea is to use chocolate (we are partial to white chocolate) instead of cake...you make them solid or hollow to fill with other candy. What a "kool" way to impress your guests this Easter!

Check out some other decorating ideas (using our featured 3-D cake pans) from Wilton's website:


Subscribe to The Daily Kool by Email


Bookmark and Share

Monday, February 16, 2009

Today's Kool Idea: Olivio Spreadable Butter


Bookmark and Share
Is there some kind of self-help group for those of us addicted to bread? Warm, freshly baked bread with a crispy crust and soft, chewy inside...yum! Forget about cookies, cakes, ice cream and even chocolate. Give us a roll slathered with butter and we're in heaven.

We admit it though. Our bread of choice is the almighty bagel. Okay, we realize that the marriage of bagels and cream cheese should not necessarily be messed with, but sometimes our palates are just begging us to treat it with butter instead. What? Blasphemy you say? Well, if we were referring to the rock hard blocks of butter that tear apart our bakery works of art, we would agree with you completely. Lucky for us, we were introduced to Olivio Spreadable Butter at a breakfast gathering with friends. Trust us...it's absolutely delicious.

Started by the famous Lee Iacocca (and son-in-law), and developed by genius chefs (well, at least in our opinion), Olivio Spreadable Butter is a blend of cream, canola and extra light olive oils...perfect for spreading (yes, even cold) and cooking. This product has half the calories of butter and 1/3 the cholesterol. Rich with 400mg of ALA Omega 3s and not hydrogenate or trans fats, Olivio Spreadable Butter is a great alternative to the traditional stuff. The company also claims that this spread is great for baking, but be aware...it is salted, so we recommend only trying it out on savory (not sweet) baking and to modify your salt ingredients accordingly. Don't worry, though, this product is definitely not too salty...just a perfect blend, in our opinion.

Straight out of the refrigerator, Olivio Spreadable Butter covered our coveted fresh bagel completely and effortlessly. We've tested it spread on all kinds of breads, including biscuits and muffins. We've also used it to enhance steamed veggies and to make the perfect grilled cheese sandwich (just spread a little on each slice of bread before cooking). The best part? We found it in our local supermarket at a reasonable price. Go ahead...we challenge you to take a slice of regular bread out of your fridge and test this delicious product for yourselves. You will definitely agree that Olivio Spreadable Butter is one "kool" idea!