Has anyone ever taken a look at the ingredients in a typical bag of bread sold in your local supermarket? Yikes! We shudder just thinking about all of the emulsifiers and preservatives on the nutrition label. Granted, it keeps the price down to a reasonable level and allows us to keep our store-bought bread in the fridge for a lengthy stay without getting moldy. But when it comes down to it, The Daily Kool is a big believer of feeding our family foods with simple ingredients that aren't a struggle to read. Unfortunately, buying healthy (yet expensive) artisan-type bread at the bakery every day is a pipe dream for most of us, especially in today's economy. What's a parent to do?
There is nothing (and we mean nothing) as amazing as the smell of home-baked bread in the morning...and afternoon...and evening. Who are we kidding? We love homemade bread, regardless of when it's made. Okay, so our obsession will clearly never place us on the cover of one of those low-carb diet books. But, we like to think that we get enough fresh fruits and vegetables in our diet to indulge in what we believe to be one of life's most delectable culinary pleasures. We have to admit though, that as adventurous as we are in the kitchen, homemade bread has always been an intimidating process for us. It can take a long time to create a perfect loaf of bread, between mixing the ingredients, kneading the dough, letting it rise (once or twice), punching and kneading again (and again), then finally putting it in the oven to bake. Whew...we could probably use a bread maker.
We have always heard great things about bread makers, but have always resisted the impulse to purchase one for ourselves. We're not quite sure why...well, maybe we do. Have you ever considered what a stress reliever punching and kneading dough is? Think about it. Let's face it though, either our schedules are fuller or we're just getting lazier with age, but we just don't have the time anymore. A bread machine would definitely simplify our lives, especially one that is as reasonably priced as the Breadman TR520 programmable bread maker.
We saw a demo for the Breadman TR520 programmable bread maker on QVC yesterday and were really impressed with how easy it seems. They made a big deal about the cost, but with shipping, it winds up only being a couple of dollars less expensive than the one featured on Amazon. Regardless, for the typical family, this an absolute bargain at under $60, especially compared with others on the market. If eight functions with 39 programmable options weren't enough, the Breadman TR520 has a host of other features that we love. The digital display with viewing window also includes a crust color control, one-hour warm cycle and (our favorite) a 13-hour delay timer. Imagine putting the ingredients in your bread machine before you go to sleep and waking up to a luscious aroma in the morning...not that we are ever able to get 13 hours of sleep in one night (don't we wish), but that's just us being fickle about it. Add a fruit and nut add-in beep, a recipe booklet and a viewing window to keep tabs on our creations (yes, we're anal), and we've got everything we need to bake a perfect loaf of homemade bread.
The biggest complaint that we have come across with the Breadman TR520 is that the digital display is kind of hard to read. What the company's executives were thinking when they put white lettering on a yellowish beige panel is anyone's guess. Maybe there was something in the yeast that day, but it was really a pretty dopey move on their part. Also, watch out for the kneading paddle...it is likely to come out of the machine with your bread. Oh, and make sure to put your Breadman TR520 far enough back on the counter so it doesn't "walk" off and smash itself to bits. Overall, the issues seem pretty minor for what you're getting with this great machine. The Breadman TR520programmable bread maker is clearly a convenient and practical way to create yummy loaves that are affordable and healthy for the entire family. How "kool" is that?
Cooking is a very popular but messy affair in The Daily Kool household. We tend to favor many one-pot wonders for our meals, like soups (especially from our Daily Soup Cookbook) and stews. Most of our dishes require lots of loving attention, and yes, plenty of stirring. There's only one problem. For some strange reason, we have always had an aversion to using a spoon rest. We hate the thing...who knows why. Just chalk it up to one of many, many little quirks that our psychologist would have a field day with...yep, we've definitely been avoiding him these days. Anyway, we usually just settle for setting our stirring utensils right there on the stovetop, cringing at the mess, but resigning ourselves to just dealing with it later. Okay, so we're a little strange.
Did you ever get one of those goofy little kitchen gadgets that you suspected doubted would ever rise above the bottomless pit of your junk drawer? We admit it, we were convinced the utensil pot clip by Trudeau completely fell into that category...until we used it for the first time, that is. It's colorful, it's cute and it's one of the "koolest" kitchen gizmos we've come across since um, the widget or something. Who knew this little guy could become so indispensable? Designed to clamp securely to the side of most saucepans and stockpots, the utensil pot clip features an arced slot to hold the handle of a spoon, turner or ladle. It is heat-resistant up to 600 degrees and prevents drips on the stovetop, keeps utensils handy and eliminates the need for that darn spoon rest.
Trudeau's utensil pot clip is such a simple, yet innovative solution to a common problem...we're just steamed that we didn't think of it first! We have a couple and we really use them all the time, especially when we've got a crowd coming for a big meal. Keep in mind that unless you find them at your local Bed Bath & Beyond or other kitchen store, the company selects the colors at random so you won't likely get your preference. Our pots are black, so it didn't make a difference to us. Also, though we've never, ever had this problem, we did come across one person who complained that the silicone bumpers kept coming off in the pot. Nouvelle cuisine, perhaps? Anyway, there's a whopping five-year warranty on this $7 item, so if you ever have a problem, Trudeau will take care of it.
The utensil pot clip by Trudeau is an absolute must-have for anyone who likes to cook, but dreads the traditional spoon rest. Okay, so it's great regardless of whether or not you have the same wacky pet peeves that we do here at The Daily Kool. It has truly become one of those practical, space-saving kitchen gadgets that we now wonder how we ever got along without. Easy to use, easy to clean and oh so convenient, the utensil pot clip has permanently found it's place of honor far, far away from our infamous junk drawer. Man, we really have to clean that thing out one of these days.
The Daily Kool has fallen in love again...with hot dogs! Hot dogs, you ask? We recently took a trip back to New York City and relived a tradition from our younger professional days. You guessed it. The "dirty" dog. You know what we're talking about. Those amazing hot dogs you get on the street corner for a couple of dollars...piping hot dog, freshly steamed buns and all the luscious toppings you can get on top. Getting hungry yet? There's just something about the "dirty" New York City water that makes those hot dogs taste absolutely amazing. We can't figure out what it is, but a "dirty" dog is an experience that everyone who visits the city should have. Your life will never be the same. We just wish we could recreate this hot dog nirvana at home.
Thanks to a local Atlanta inventor, now we can get pretty close. We came across Chris Schutte on QVC last week, demonstrating his innovation, the EZ Steam Grill universal steaming insert. We were intrigued enough to go out and do a little more research. Frankly, the man himself is as inspiring as his invention. It seems that after becoming a victim of today's struggling economy in 2008, the suddenly unemployed father of two was able to turn adversity into profit with a dream fifteen years in the making. And it all started with a typical man's love for the stadium hot dog.
This two-piece combination set comes with two universal steaming inserts (6.5" and 8.75") that are adjustable to fit any medium to large pot to make a perfect hot dog in less than five minutes. Simply place the insert in the pot and boil some water. The "grill" rack design allows you to slip a couple of hot dogs into the water through the cross-shaped center opening to boil, place the buns on top of the EZ Steam Grill, cover and cook for a few minutes. That's all there is to it, folks.
Not ones to be impressed with a one dish wonder (no matter how addicting), it's nice to know that we can use the EZ Steam Grill universal steaming insert to prepare a host of delicious meals besides the hot dog. Imagine the ease of preparing a yummy dish of steamed salmon, tender-crisp broccoli and fettuccine alfredo in a single pot. Or spice up some chicken andasparagus to steam and plate with already prepared brown rice. Love steamed lobster tails with melted butter? A little creativity is all it takes to get a beautiful and healthy meal with the EZ Steam Grill. We love how much versatility this product adds to our existing pots. Keep in mind though, this product does not seem to be designed to feed a larger family at once. Plan on cooking for about 2-3 people for the more complex meals, unless of course you use two pots and both inserts. Hot dogs only take a few minutes, so you could probably do a quick batch for a larger crowd, doing two or three at a time (per insert).
The EZ Steam Grill universal steaming insert guarantees a perfect hot dog every time. Easy to use, reasonably priced (around $15 for the set of two) and oh, so convenient, this "kool" idea is the next best thing to having your very own New York or stadium hot dog vendor. Now, if we could only arrange to have the city's "dirty" water shipped to us regularly, our lives would be perfect...well, almost.
We at The Daily Kool are huge soda drinkers. Oh yeah, we love them all...from Coca Cola to Orange Crush to Canada Dry Ginger Ale, each one of us has our own soft drink obsession. Are we the picture of good, healthy habits, or what? We're actually pretty good about drinking mostly water, especially since we've found Fiji, but sometimes, we just have have a can of soda with a nice meal. There's just something about the fizzy tickling sensation going down the back of the throat, coupled with just the right amount of sweetness...ah, instant satisfaction.
Because everyone has his/her own favorite, we tend to keep a variety of cold soda cans on hand in our fridge for family and company. Why cans, you ask? Yes, 2-liter bottles are much more cost-effective, but cans allow us to cater to everyone's tastes while monitoring intake at the same time...we make it a point to restrict ourselves to one can a day...with the exception of club soda. Cans of club soda (we like La Croix) are great for getting a healthier soda fix on the go.
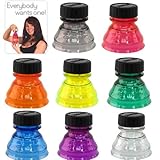
Like most people, our biggest challenge with cans is keeping the soda from going flat...unless we drink the whole can at once, of course. We have no shame in admitting that we refuse to drink soda that has gone flat...we're kind of snobbish that way. We have tried out so many "fizz keepers" over the years, without much luck. A couple of weeks ago though, we came across these amazing Snap Capp reclosable can tops. Made in the U.S.A. (a big plus with us), plastic Snap Capps convert an ordinary 12 or 16 oz aluminum beverage can into a portable, recloseable and non-spilling bottle. Okay, we were definitely intrigued enough to try this one out.
We just love it when a product does exactly what it says! We purchased a sleeve of eight Snap Capps in different colors to test out at home. We chose Orange Crush for the test to make sure we used something that would clearly show up if the product leaked. After opening the can, we simply snapped the cap onto it. It took surprisingly little effort, and the Snap Capp made a clear "pop" when it was on correctly. We then twisted open the top cover, and drank from the soda as if it were a bottle. Wow, it really was a spill-proof seal...kool!
After a couple of sips, we put the can back into the refrigerator to let it sit for a few days. Our soda actually stayed fresh and fizzy for four days, which is about the same amount of time a two liter bottle will keep in our house. After enjoying the rest of our orange soda, we held onto the Snap Capp, squeezed the middle of the can, and popped it right off. A quick rinse with hot water, and we were ready to use it again.
There are so many things we like about our Snap Capp recloseable can tops. The assorted colors ensure that each person remembers which is his or her can...a particular advantage at some of our family gatherings. Spillage is much less likely, especially in the car or with the kids...as long as the cap is on, of course. Don't get us wrong. We didn't exactly shake the can vigorously for several minutes after putting on the Snap Capp...we're not sure we're all that interested in testing it that extensively, anyway. But, with normal use, we found the seal perfectly tight. Plus it makes drinking from a can safer; we don't have to worry about cutting ourselves on any sharp, metal parts. The best part is how much less soda waste we have...we no longer feel the need to polish off a whole can in one sitting. We just put the leftovers back in the fridge until later, without worrying about it going flat.
Snap Capp reclosable can tops are great for picnics, parties, in the car and even at the office. We even brought a couple to the zoo last week for when we treated ourselves to a couple of cans from the machine. The Snap Capp gave us the flexibility to walk around, without being encumbered with open beverage cans. We're definitely giving a couple of these to our fellow soda, energy drink and yes, even beer lovers!
Fall is a busy time for The Daily Kool family. This is the time of year that we celebrate the season with large dinner parties. Oh, and we invite everyone! Ah, yes...food is definitely the catalyst that brings us all together. Always has been. It's nothing for us to expect 30-40 guests in our admittedly small home for an elaborate dinner. Over the past ten years of our marriage (yikes!), our household has truly become the destination for meals galore. We only have one rule...no one brings food. Bottles of wine? Sure. Soda? Absolutely. The food though, is our domain, and we always look forward to testing out new and exciting dishes on our more than willing company. Have we mentioned how much we love to cook?
We live for the moment when our guests marvel at the sheer genius of our culinary skills...not that it happens often. Okay, we admit it...we always mess a couple of things up with every dinner. We have so many dishes in various stages of preparation, cooking and plating, at least a few of them always fall through the cracks. Over-boiled soup, scorched veggies, mushy risotto and dry (we sometimes forget to baste) turkey are just a few examples of the disasters we've encountered over the years. It's not easy staying on top of everything all at once.
Thank goodness for our cousin. Last time she came over, she gave us this absolutely adorable Done Right multiple cook time kitchen timer as a hostess gift. Check it out...there are five (count them) separately functioning timers in one oven-shaped package. Each of the five timers gives off a sound flashes with a light when ready. This little guy is just what we need to stay on track! We love how we can correspond the stove top timers with each of our burners, while the front timer reminds us when to check the oven. We were actually amazed how easy the Done Right timer was to program, even for us technically inept folks. Just press the 1 or 5 minute increment button until the desired time is reached and press start...it's that simple. Seriously, how great is this little gadget? And, why didn't we think of it first, darn it?
There are a couple of things that we've noticed with our own Done Right multiple cook time kitchen timer that we wanted to pass along. First off, the alarm itself is fairly low, which is why they've added the flashing light component, we suppose. It would have been nice to have a volume adjustment option. Honestly though, it's not much (if at all) lower than our regular oven timer. Plus, one of us is always in the kitchen, so it's not particularly a problem for us. Also, we always use the company's suggestions for prolonging battery life. When we aren't cooking up a storm, we remove one of the four AA batteries, and usually make sure to stop the flashing light before its one-minute automatic shut off. You can find this kitchen timer at several websites, including Amazon, Target and Walmart. Our research though, shows that QVC seems to currently have the best price at just under $20 (plus shipping)...this the the main link we've provided throughout the post.
We love our Done Right multiple cook time kitchen timer so much, we leave it out on our stove top, even when we're not using it. Sure, it's a little larger than your standard kitchen timer, but talk about a fabulous conversation piece. What a wonderful novelty gift for anyone who spends oodles of time in the kitchen...particularly those of us who need a little help with the orchestration and execution of our larger dinner parties. Form and function are definitely the right combination with this super "kool" idea. Of course, we've just eliminated our best (and most plausible) excuse for a not-so-perfect meal. Aargh...the pressure!
Guess what The Daily Kool found out? There is actually a National S'mores Day, and it's today (August 10)! Ah, s'mores...the delicious gooey campfire treat that is made up of graham crackers, chocolate and marshmallows. These are even worse than those potato chips (sorry, Lays). There is no way we can eat just one...we need "s'more, s'more!" Hence, the name. Bet you didn't know that, did you?
We have to admit that we're a bit confused, though...it happens to us often, we're afraid (must be the sugar high). Why on earth is National S'mores Day in August when National Camping Month is June? Darn it...now we have yet another excuse to indulge in this decadent dessert. Our taste buds might be cheering, "Hooray," but our ever-expanding waistlines are shouting "No way." No doubt about it, taste buds win hands down. There's only one problem. How do we make s'mores at home without the benefit of a roaring campfire?
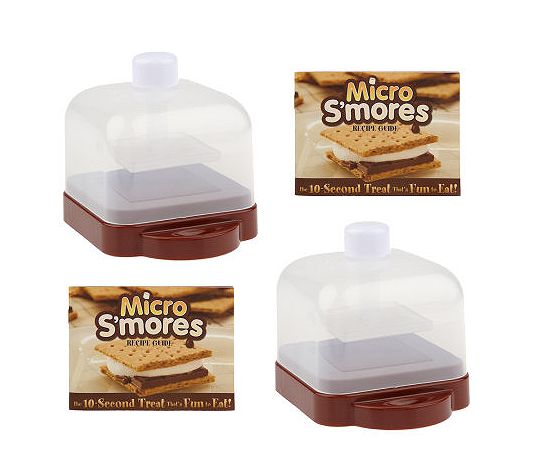
Check out the Micro S'mores microwave s'mores maker. We came across this nifty little gadget while watching the cooking show on QVC yesterday...Sunday's cleaning day, and we do need some non-cartoon entertainment every once in a while. Anyway, Micro S'mores (complete with recipe book) claims to make the most delicious s'mores you've ever had in ten seconds or less. The process is simple...just load the Micro S'mores with a graham cracker, chocolate and one marshmallow (don't forget to top with another cracker), pop on the lid and microwave on high for 10 seconds. The domed cover is apparently designed to ensure even microwave energy distribution from the inside out, keeping the graham cracker crisp while completely melting the chocolate and marshmallow. At the same time, the auto-plunger applies just the right amount of pressure to form the perfect s'more.
While it is unlikely that the Micro S'mores will yield that true roasted marshmallow flavor of a traditional s'more (really, how could it?), it certainly offers a yummy alternative. Plus, if it works as well as it seems to on television, The Daily Kool is absolutely sold. The overwhelming positive reviews suggest that the Micro S'mores is just as great as it seems. Sure, we could probably produce passable results with a simple tea light and save the $22 or so. But the Micro S'mores seems like a lot of quick, kid-friendly fun. Plus, it'll give us a great opportunity to experiment with different s'mores flavors, right in our kitchen. How "kool" is that?
We love that the order actually comes with a set of two individually boxed items. We'll probably give the second one as a housewarming gift. Think of how impressive it would be to fill a large basket with the Micro S'mores, surrounded by packages of graham crackers, cookies, marshmallows and different types of chocolate. Oh, yeah...our friends love us. In the meantime, try this twist (albeit extreme) on a genuine classic. Enjoy!
Caramelicious Cookie S'mores Ingredients two oversized chocolate chip cookies 1 caramel-filled chocolate piece, your brand of choice (we like Ghiradelli) 1 large marshmallow
Directions: Place the caramel-filled chocolate piece on one cookie, top with a marshmallow, and top with the second cookie. Put it into the Micro S'mores and cook for 7-10 seconds.
Note: If you're going the traditional way, heat your marshmallow over a fire. Place the chocolate onto a cookie. Top one cookie with your toasted marshmallow and close like a sandwich.
We been having an ongoing challenge these days in The Daily Kool household. Our boys are at the age when we have to constantly remind them to wash their hands. It's not as if we are obsessive about cleanliness (well, maybe just a little). We do have rules, though. Washing hands after coming in from the outside, after meals and certainly after using the toilet shouldn't be too much to ask, right? Apparently, it just might be...at least for our boys. You should just hear some of the arguments and excuses coming out of our two little guys...everything from "My leg hurts and I can't stand by the sink" to "My hands aren't that sticky from the breakfast syrup." Our favorite of course, is the ever-popular "Hey, we stand up anyway...what's the big deal?" Imagine our embarrassment when our four year old proudly confessed to his grandmother how often he and his brother try to "trick us" into thinking that they've washed their hands (as if we didn't know). Seriously, they expend more energy trying to avoid washing their hands than it would just take to do it already. Sheesh!
Yesterday, we visited a friend that we hadn't seen in a while. She had just renovated her guest bathroom with a more modern motif. She opted for one of those glass sinks sitting on a pedestal and colorful mosaic tile along the walls. Perhaps the "koolest" feature however, was the H2Glow temperature sensitive LED faucet light she had installed. H2Glow works by illuminating the water as it comes out of the faucet. The water glows deep blue when it is safe to touch and automatically switches to red when it starts to get too hot. How great is this? H2Glow seems to be just what we need to help encourage our kids to wash their hands more often. Adults clearly think it's pretty terrific also (our friend doesn't even have children). We want it! We want it!
After doing a bunch of online research, H2Glow really seems to be the highest quality temperature sensitive LED faucet light available. This fully automatic gadget comes with the faucet attachment, two adaptors, batteries, a spare filter screen, water flow restrictor and a manual. We took a look online at the installation instructions, and they seem pretty easy and straightforward...just seven steps. We would anticipate our kids using a lot more water with the H2Glow (hey, that's kind of the point, right), so the built in flow-limiter takes a load off of our environmentally conscious (and thrifty) minds. Plus, not only has H2Glow received overwhelmingly glowing (we couldn't resist) reviews, but Sector Labs (the company who makes it) has a great reputation for ensuring customer satisfaction. We never know when we might have an issue, so a company who guarantees their products is a big draw, especially when we are ordering online.
We can truly envision our bathroom soon becoming the most popular room in the house with the H2Glow temperature sensitive LED faucet light. We love the safety element with this...what a great way to avoid burning little hands with scalding water! We must point out though, as parents, we would seriously caution our kids to always be careful and not to completely depend on it to determine how safe the water is to touch. We just love the entertainment value...H2Glow would definitely change the way we experience water every day. Just imagine how amazing the LED faucet light must look in the dark! Might be a nice addition to a kitchen faucet also. H2Glow is definitely one "kool" gadget we can't wait to get.
Our wedding ten years ago (yikes!) was a beautiful Victorian affair with rich fabrics, bold colors and flowers in every corner. We even found these beautiful jewel-toned potpourri pillows at a local flea market. Each pillow was an actual picture frame, and we decided to use them for place card holders/party favors. Thank goodness they were all individually wrapped or the scents would have been overwhelming! Anyway, we spent the last night before our wedding carefully cutting open each pouch, putting the place card in the holder and resealing the plastic wrap. It was a long and tedious process, but the results were truly magnificent.
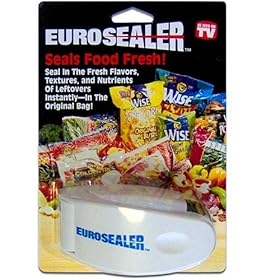
We have the As Seen on TV EuroSealer to thank for making our little wedding project work. Designed to provide an inexpensive and easy way to perfectly reseal unused portions of food in seconds, the EuroSealer was a perfect solution to reseal the plastic bags for our place card holders. Talk about thinking outside of the box (thanks, Mom...for everything). Believe it or not, the EuroSealer was about the same price ($9 or so) ten years ago as it is today, and is just as innovative an idea for creating an airtight seal along the edge of any plastic bag in just seconds.
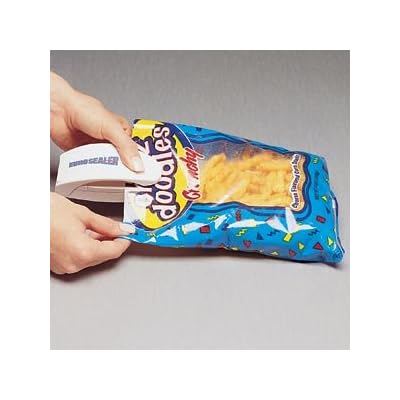
Our EuroSealer lasted up until just a few months ago. That's right, we got almost a decade of use out of this little guy. We've used it on just about every plastic bag we could think of, including frozen fruit and vegetables, crackers, chips, even frozen waffles. There is a little learning curve to adjust to each type of bag, depending on the flimsiness of the plastic bag, but we've never had a problem getting the right seal. The trick is to find the right balance of pressure and speed. Our wedding project gave us enough practice to become experts with the EuroSealer.
When the little strip that holds the heat finally wore off after literally thousands uses, it was as if it marked the end of an era in our lives...okay, so we're a little sentimental. We were so happy when we saw the As Seen on TV EuroSealer display at our local Bed, Bath and Beyond. Needless to say, now that we have one back on our fridge, the EuroSealer has definitely earned its feature on The Daily Kool. Imagine our surprise at the mixed reviews we came across on Amazon...we just can't understand why anyone would have an issue with the EuroSealer. It's not fancy, but it gets the job done, locking in freshness and flavor quickly and conveniently. Apparently, many complaints have come from people who didn't realize that it takes two AA batteries to work. Once they figured that out, problem solved.
Maybe we're biased because of our history with the EuroSealer, but this is one As Seen on TV investment that has really paid off over the years. Our new one works just as well as the original, and we use it almost every day. The bag cutter works great, and is a nice extra. We love that although it uses heat to seal the bags, it cools off immediately. Overall, the As Seen on TV EuroSealer is a great alternative to plastic clips and twist-ties. Plus, it really cuts down on the need for storage bags. Easy to use, convenient and inexpensive, this is one "kool" idea that is definitely worth trying out.
One of the most wonderful things about the summer is the abundance of fresh Bing cherries. Dark and sweet, this cherry is one of our all-time favorite fruits. We've been known to go through bushels of them in a sitting. Another funny story about our older brother growing up (we've told a few of them!)...our grandmother somehow convinced him that if he ever swallowed a pit, a real cherry tree would grow in his tummy. Talk about traumatizing a child...gotta love it, especially as a younger (and often tortured) sibling! Hence, our poor brother, though he loved them, hardly ever ate cherries for fear of what would happen...what a wuss!
Our children also love cherries, but have no qualms about recruiting us for cherry pit removal. So, being the ever loving parents that we are, we spend lots and lots of time sitting in front of the television hand-pitting cherries with our sharpest paring knife. Anyone who has kids can probably appreciate our misery. Dissecting cherries one at a time by hand is...well, the pits. There has to be a better way, and so we just decided that it might be time to find ourselves a cherry pitter.
After doing a bunch of research, it looks like Lehman's Best Cherry Pitter is just that...the best. The company boasts how effective it is at removing pits quickly without bruising or crushing the cherries...we're all for less mess and no wasted fruit! It's actually pretty reasonably priced at around $35 also. Basically, the stainless steel punch rod forces the pit through a gasket into the see-through waste container, then automatically lifts the cherry and drops it into the bowl. We love being able to place several cherries into the feed tray, instead of handling them one at a time. Imagine effectively pitting dozens of cherries in just minutes..what an amazing time saver. Plus, the parts are dishwasher safe...who could ask for more?
There is only one possible catch that we can envision with Lehman's Best Cherry Pitter. It's unreasonable to expect perfection each and every time, so we can imagine a cherry or two sneaking into our bowl unpitted. And, assuming that each pitted cherry really does come out whole and virtually undamaged as the company claims, it might be easy to miss a particular cherry that still has a pit inside. Not a huge problem when just eating cherries for their simple enjoyment, but definitely a consideration when baking fresh pies and cobblers for dinner guests. So, we'll just have to put out a small disclaimer, and pray that everyone's dental work is up to date.
Regardless, Lehman's Best Cherry Pitter is worth the risk of an occasional escapee. We'll probably keep a pretty close eye on the hopper to make sure each pit does indeed come out. The best part? This pitter looks safe and easy enough for children to use. Anyone who reads our blog knows we're always looking for ways to put our kids to work...under the guise of fostering independence, of course (sneaky, sneaky)! Ideal for canning, freezing, dehydrating and baking, Lehman's Best Cherry Pitter is a definite "kool" idea for enjoying one of the summer's sweetest treats.
Refreshingly "Kool" Cherry Soup Recipe
Ingredients:
1/4 lemon, peeled and seeded
1 3/4 cups water
1/2 cup sweet red wine
2 cups pitted sweet cherries
1/4 cup sugar
1/4 teaspoon cinnamon
1 1/2 teaspoons cornstarch
Directions:
Chop peeled and seeded lemon into small pieces and blend with water until it forms a smooth pulp.
Put the lemon pulp, cherries, sugar and cinnamon in a medium, heavy-bottomed saucepan. Bring to a boil, then reduce heat and simmer for about 5 minutes.
Dissolve the cornstarch with a little water and add with the red wine to the soup mixture.
Stir constantly over low heat until slightly thickened.
Cool to room temperature in an ice-water bath, then chill for at least 30 minutes in the refrigerator.
Remove cherries with a slotted spoon and blend until coarsely chopped.
Stir the cherries back into the soup mixture and serve.
What better way to celebrate the end of our National Ice Cream Month week-long feature than with cake? Or should we say cupcakes? The Daily Kool family is headed out to a friend's house for dinner together tonight...of course, we're in charge of the dessert (we have a bit of a reputation). Since there's going to be a pretty large group of kids at the house, we thought it might be fun to do something a little different for them.
Take a look at this adorable ice cream cone cupcake baking pan from Nordic Ware. Since we are always on the lookout for unusual novelty pans, we're pretty excited about this one. Do these cupcakes look just like ice cream cones, or what? Gotta love that Nordic Ware! We really love the detail of this pan. Constructed of heavy cast-aluminum, it is non-stick coated for easy cake removal and clean up. Plus, since the pan measures 3" deep and 10.5" across, it will produce six nice size, cone-shaped cupcakes at one time.
Our creative juices are really flowing with possibilities with the Nordic Ware ice cream cone cupcake baking pan, but we're keeping it pretty simple for tonight's event. We're going to bring several cans of Betty Crocker easy flow icing and some sprinkles to make the "ice cream" to top our cupcake cones. The kids can sit down and decorate to their hearts' content. We'll also bring along a couple of containers of real ice cream...our local supermarket has a "buy one, get one free" special going on this week. The kids can top their cupcakes with ice cream instead of the frosting, or maybe we'll just give each of them a plate and put a scoop on the side so they can have it all...yep, that's probably the way we'll go.
As with all high quality baking pans, we strongly recommend hand-washing this one. Hey, superior baking comes at a superior price (around $35), so we'd prefer our pans to last forever. Also, make sure to grease the Nordic Ware ice cream cone cupcake baking panvery well to avoid stickiness. With so many intricate details to create the realistic effect, even a non-stick coating just isn't enough. Pam baking spray with flour (found in your local supermarket) always gives us excellent results. Experiment with a boxed cake mix first...it's easier, kids love it, and it tends to have the great consistency for beginners with these kinds of pans.
It's just too bad we can only make six cupcakes at a time...we'll be spending most of the day in the kitchen baking. But, with this super "kool" Nordic Ware ice cream cone cupcake baking pan, we are absolutely going to be the hit of the party tonight. Yeah we know we're showoffs, but seriously...how could we resist?
Here at The Daily Kool, our arms are getting quite the workout this summer...well, at least one arm, anyway. Our kids have been having one playdate after another at the house, and we've been doling out ice cream scoops practically by the dozen each day. Dig, twirl, release...dig, twirl release. Such is our life. It's amazing how one single perfect scoop of ice cream just seems to brighten a child's day...wait a minute, did we say perfect? A lofty, yet often elusive goal, we know. But apparently (and we've just recently learned this, mind you), a dish or cone of ice cream just tastes better to a kid if it has that professional, ice cream parlor look. Go figure, but kudos are important in the world of parenthood...we'll take what we can get. Pretty shallow of us, isn't it?
Good thing we have our Zeroll original ice cream scoop. We know, we know...an ice cream scoop is really not something most people think twice about when getting. Ours was a bridal shower gift ten years ago (yikes, has it been that long?). We do admit though, our Zeroll original ice cream scoop has gotten plenty of use over the years and is arguably still the best on the market. The Daily Kool has certainly never considered or needed a replacement. The secret is a heat-conductive, anti-freeze solution encased within an aluminum alloy. The fluid in the handle responds to the warmth of the hand, helping the bowl roll and release even the hardest ice cream instantly.
The Zeroll original ice cream scoop is actually pretty comfortable to use, regardless of whether you're right or left-handed (we have both in our family). Plus, it is apparently a top choice of ice cream parlors. However, this professional-grade ice cream scoop does come with a couple of note-worthy considerations. It is absolutely, positively, without a doubt not dishwasher safe...keep temptation away, folks! Trust us, we are as lazy as the next person, but even we take the time to hand-wash this one. One cycle in the dishwasher can render the anti-freeze fluid useless, so don't take the chance. Plus, even the best ice cream scoop in the world may need a little help every once in a while. If your ice cream has formed into a solid block in the freezer, try pre-warming the handle in lukewarm water for a few seconds, then dry quickly with a soft cloth before scooping. Allowing the ice cream to temper a bit results in a faster and effortless scoop and release.
The Zeroll original ice cream scoop is so innovative that it's apparently been displayed at the Museum of Modern Art in New York City. Art? Well, our ice cream scoops do come out beautiful enough for the kids to make great funny faces out of mini M&Ms, marshmallows and licorice...does that count? Perhaps it's a little pricey (around $15), but the Zeroll original ice cream scoop is definitely worth it. With the proper care, this product just might make it through another decade of marriage. How "kool" is that?
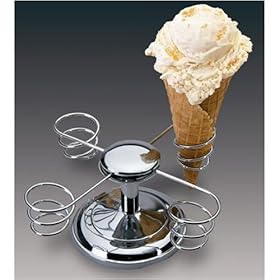
Our posts honoring National Ice Cream Month have received a lot of interest from our loyal readers, particularly yesterday's "kool" idea, the Chef's Choice Waffle Cone Express ice cream cone maker. However, our review brought up an intriguing point...is a wire rack really the best choice for cooling off our ice cream cones? What if we do decide to decorate them or simply add some melted chocolate to the bottom? A wire rack would most definitely result in a bit of a mess if we laid our fancier ice cream cones on it. We need a better solution...that's right, an ice cream holder!
The Daily Kool has found some professional-grade acrylic ice cream cone stands. They're...okay. But being the vain people we are, we want something a little more decorative for our home. Not to worry...Chef's Choice is one step ahead of us with this snazzy ice cream cone holder. This shiny chrome, no stain and easy to clean cone holder is just what we need to create a beautiful presentation. The Chef's Choice Ice Cream Cone Holder boasts four rotating arms of spiraling wire that are designed to even handle heavier ice cream cones securely. The low profile is supported by a weighted four-inch base that won't tip, even when only one cone is in place. Of course, the Chef's Choice Ice Cream Cone Holder is ideal for helping freshly made cones maintain their shape after rolling.
The Chef's Choice Ice Cream Cone Holder is a fun and practical way to support homemade cones for filling and display them for eating. What a terrific accessory to the perfect ice cream party! It's truly like having two extra pairs of hands, convenient in the rare event that someone chooses to put his ice cream cone down for a moment. As crazy as it sounds, not everyone inhales their ice cream like we do at The Daily Kool. Our only contention with the Chef's Choice Ice Cream Cone Holder is that it is only designed to display four cones...okay for a family of four, but a regular recipe yields a batch of eight. Though it seems like we can stack cooled cones inside each other, it would be nice if Chef's Choice offered a larger version of the ice cream cone holder with an additional level to handle at least four more separately.
Regardless, the Chef's Choice Ice Cream Cone Holder is definitely a perfect companion to the Waffle Cone Express. A delightful addition to any summer ice cream party, this holder is a "kool" and handy product that does its job well.
Nothing says summer quite like an ice cream cone. Some of our best childhood memories include strolling down the boardwalk by the beach with our parents, eating ice cream cones while watching the ocean waves crash against the shore. We could never quite understand how anyone could dishonor the sanctity of ice cream by eating it out of a cup. Good thing we've never quite grown up...as adults, we still love our ice cream cones, even when the sticky mess drips down the side of our arms. Waffle cones help us stay a bit cleaner...not that we care much. We just love them because they are so darned yummy!
At The Daily Kool, we have a bit of a dilemma when it comes to addictions like these. Our taste buds require easy and immediate access for those occasional (okay, frequent) cravings, but our inherent laziness prevent us from taking more trips to the ice cream parlor to satisfy them. Plus, the cost definitely adds up! Sure, ice cream cones are available at our local supermarket, but have you ever read the ingredients in those things? Too many unpronounceable words for us...blech.
Take a look at the Chef's Choice Waffle Cone Express ice cream cone maker. Seriously, folks...nothing beats the incredible aroma and freshness of a home-baked waffle cone. This ice cream cone maker features an advanced professional baking system that delivers homemade, freshly baked sugar cones in about two minutes. Yes, you heard us right...two minutes. Who could resist that temptation? Like your ice cream cone crispier than the average aficionado? No problem...a color-control dial makes that personal browning preference easy to select. An instant temperature recovery feature allows for continuous baking..cone after cone. The unique locking latch function with easy-clean overflow channel ensures each ice cream cone will be uniform in thickness for perfect results each and every time. Plus, the built-in cord storage compartment makes it convenient to keep the Chef's Choice Waffle Cone Express ice cream cone maker in a space saving, upright position.
A plastic cone-rolling form is included with the Chef's Choice Waffle Cone Express ice cream cone maker. Illustrated instructions and detailed recipes make it easy to become a master ice cream cone maker in no time. We love how the recipes use everyday ingredients we typically keep stocked in our pantry, and our creative juices are already flowing with several possible variations. Chocolate dipped sprinkle cones, waffle cups, cookies and even cannolis...our waistlines are expanding as we speak! Just be careful when rolling the ice cream cone...it has to be done when it's hot or it won't form properly. Also, make sure to pinch the end properly to prevent ice cream from leaking out...pouring some melted chocolate in the bottom of the cone is an easy (and tasty) solution. Though it has a non-stick coating, we recommend spraying or brushing the Chef's Choice Waffle Cone Express with a little oil before use to make it that much easier.
The Chef's Choice Waffle Cone Express ice cream cone maker is a great way to enjoy the crunchy sweetness of this sugary treat, straight from the kitchen. It's available all over, but we found the best deal at Bed Bath and Beyond with our 20% coupon...just go to the store to save on shipping, or type in your coupon code online. For about the price of a couple of trips to the ice cream parlor, you can produce delectable, edible delights that are sure to impress each and every time. Friends and family will be amazed at your culinary genius, never guessing how "kool" and easy it is...that's okay, we won't tell if you don't.
Basic Gourmet Waffle Cone
Ingredients:
1 whole egg
1 egg white
1/4 tsp. salt
1/2 cup granulated sugar
2/3 cup sifted all-purpose flour
2 tbsp. butter, melted and cooled slightly
Directions:
Preheat the Chef's Choice Waffle Cone Express. Start with Color Control setting of 2 1/2 to 3, but change as necessary for best results.
Beat the egg, egg white and salt in a small bowl with a fork or hand-held mixer until well blended. Beat in the sugar and beat until sugar is incorporated and the egg has lightened in color slightly, about 1 minute. Add flour and beat another 15 seconds or until incorporated and all lumps are gone. Add the melted butter and stir until well blended.
Spoon 2 tablespoons (1 ounce) of batter in the center of the iron. Bake for 1 minute then check for proper color. Cook an additional 5 to 10 seconds if necessary.
Quickly remove the waffle from the WaffleCone Express™ onto a clean cloth towel. If the waffle is too hot to handle with your bare hands, use the cloth to help lift and roll the waffle around the cone form. Hold the cone a few seconds to set its shape then place on a wire rack to cool.
The Daily Kool family has always toyed with the idea of getting an ice cream maker for our home. As parents, we are often concerned about controlling the quality of ingredients in the food our children eat. Store-bought ice cream often has additives, so we often prefer the premium brands...hey, if we can't pronounce it, we certainly don't want to eat it. But, wow. Premium ice cream definitely comes at a premium price. An ice cream maker may seem like a perfect solution, but since no one in our household can ever agree on one flavor (heaven forbid), we always figured it would be a wasted investment...until now.
Check out the Cuisinart ICE-40 Flavor Duo Ice Cream, Frozen Yogurt & Sorbet Maker...yep, it can make two different batches of ice cream at the same time. How "kool" is that? This sleek machine is fully automatic and can produce one or two quarts of frozen dessert in about 20 minutes. Cuisinart boasts the smoothest and creamiest ice cream, frozen yogurt and sorbet with this attractive appliance...all at the touch of a button. Made of heavy grade plastic (available in black or white) and brushed stainless steel, this just might be the ice cream maker we've been looking for. A control switch is easily set to activate both bowls or just one. We love having the option of simultaneously producing either one or two quarts of one flavor, or one quart each of two different flavors. Plus, the machine is easy to clean...a definite requirement in our family.
Making ice cream in the Cuisinart ICE-40 Flavor Duo Ice Cream, Frozen Yogurt & Sorbet Maker seems like a breeze. Simply stick the double-insulated bowls in the freezer for 6-12 hours, then place them in the base. This is a critical step, since well-chilled canisters and cold ingredients are the key to success with this and any other ice cream maker. Insert the plastic paddles into the machine and place the cover units on. Select the one or two side option, turn on the motor and pour the mix into the unit through the easy pour spout. The plastic covers make it easy to see how the base is coming along. Voila...in about 20-30 minutes, it's time for dessert! There are definitely a few things to keep in mind when deciding to purchase the Cuisinart ICE-40 Flavor Duo Ice Cream, Frozen Yogurt & Sorbet Maker. Although it looks pretty sharp with its long, low profile, the dimensions of this machine make it just too large to sit out unless it's being used daily...though that is a possibility with the ice cream fanatics in The Daily Kool household. But most of us should plan on having a place to store it when not in use. Also, we understand that the machine is pretty loud when operating...just something to keep in mind with guests and children who are sensitive to noise. If there's space, it might be easier to just keep the bowls in the freezer all the time for an impromptu craving. Just make sure to keep the bowls in a plastic bag to avoid freezer burn when removing.
We love stuff in our ice cream..nuts, cookie bits, candy, fruit, pickles (just kidding). The Cuisinart ICE-40 Flavor Duo Ice Cream, Frozen Yogurt & Sorbet Maker says to add any special ingredients in the last five minutes for best results and a truly individual concoction. Only one problem...if the pieces are any larger than a chocolate chip-sized small dice, they can jam up the mixer. This may be fine for the kids, but we adults like chunks in our ice cream...big, big chunks. For us, it'll just be easier to incorporate our mix-ins with a rubber spatula after the ice cream is made. We also prefer a firmer texture with our ice cream, so we will likely transfer the desserts to our beloved Lock and Lock storage containers and place them in the freezer for a couple of hours before enjoying. However, frozen yogurt should be eaten immediately or it might become a bit too hard and lose the smoothness commonly associated with it. The machine does come with a recipe book for ice cream, sorbets, sherbets, frozen yogurts and mixed frozen drinks (with or without alcohol), and there are countless lower-calorie recipes online for the more diet-discerning palette.
For anyone interested in experimenting with different flavors, making sorbet and ice cream at the same time, or simply satisfying everyone in the family with individual tastes, the Cuisinart ICE-40 Flavor Duo Ice Cream, Frozen Yogurt & Sorbet Maker definitely seems like the way to go. What a pleasure it would be to know exactly what goes into our frozen desserts, eliminate processed ingredients and control the sugar content. Here's an easy recipe for vanilla ice cream that is perfect for kids and those of us who are kids at heart. Enjoy!
Quick and Easy Vanilla Ice Cream
Ingredients
1/2 pint light cream
small can of condensed milk
1-2 teaspoons pure vanilla extract (according to taste)
Directions: Place all ingredients in a mixing bowl and mix until smooth. Chill in the refrigerator, then transfer to Cuisinart ICE-40 Flavor Duo Ice Cream, Frozen Yogurt & Sorbet Maker. Freeze according to manufacturerinstructions.
The DailyKool is a free daily email bringing you the “must haves” in time-saving, money-saving, or just plain “Kool” gizmos, gadgets and whozits for hectic lives. Our goal is to feature products and ideas that can solve some of the everyday problems that can bog us down…and no, we’re not talking about world peace type issues. Just the scoop on simple solutions to make the little things easier. And if we can put a smile on your face in the process...well, that’s just an extra bonus for us!
 Has anyone ever taken a look at the ingredients in a typical bag of bread sold in your local supermarket? Yikes! We shudder just thinking about all of the emulsifiers and preservatives on the nutrition label. Granted, it keeps the price down to a reasonable level and allows us to keep our store-bought bread in the fridge for a lengthy stay without getting moldy. But when it comes down to it, The Daily Kool is a big believer of feeding our family foods with simple ingredients that aren't a struggle to read. Unfortunately, buying healthy (yet expensive) artisan-type bread at the bakery every day is a pipe dream for most of us, especially in today's economy. What's a parent to do?